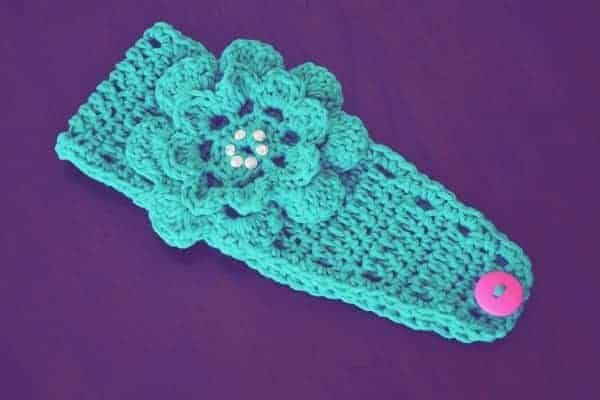
Pattern: Crochet Keyhole Border Flower Headband

*** This pattern is intended for personal use only, please. You can not sell items created from this pattern or sell the pattern itself***
NOTE: This post contains affiliate links. By clicking these links, I may make a small commission from items you purchase. Know that I only link to or recommend products that I believe in. Thank you for helping support Bre Pea!
updated 2/2013
Materials needed:
Worsted weight yarn of any color
*I used Sugar n Cream Mod Green
Scissors
Fits:
Size 22-23″ circumference
Stitches used:
ch= chain
sc= single crochet
dc= double crochet
sc dec= pull up a loop in next 2 st, yarn over, pull though all 3 loops on hook
sl st= slip stitch
st= stitch
*note: there is not a button hole in this pattern as I prefer to just use the spaces between the double crochets to slip the button through
Band:
ch 7 then…
1. sc in 2nd st from hook and in each st across (6 sc)
2. ch1, turn, ch2 (counts as a dc here and throughout the band) dc in 2nd sc from hook and across (6 dc total)
3. ch1, turn, 2sc in 1st st from hook, sc in next 4 st, 2sc in last st (8 sc)
4. ch1, turn, ch2, dc in 2nd sc from hook and across (8 dc)
5. ch1, turn, sc in each st across (8 sc)
6. Repeat row 4 (8 dc)
7. ch1, turn, 2sc in 1st st from hook, sc in next 6 st, 2sc in last st (10 sc)
8. ch1, turn, ch2, dc in 2nd sc from hook and across (10 dc)
9. ch1, turn, sc in each st across (10 sc)
10-32. Repeat alternating rows 8 & 9 (starting with row 8)
33. ch1, turn, sc dec in 1st and 2nd st from hook, sc in next 6 st, sc dec in last 2 st (8 sc)
34. ch1, turn, ch2, dc in 2nd sc from hook and across (8 dc)
35. ch1, turn, sc in each st across (8 sc)
36. Repeat row 34
37. ch1, turn, sc dec in 1st and 2nd sc from hook, sc in next 4 st, sc dec in last 2 st (6 sc)
38. ch1, turn, ch2, dc in 2nd sc from hook and across (6 dc)
39. ch1, turn, sc in each st across (6 sc)
After finishing row 39, continue around the outside of the band working in this pattern:
2 sc around each outer dc (whole post), 1 sc around each outer sc (whole post)
…starting with 2 sc in the first outer dc. Work around the side of the band until you get to your foundation chain. Sc in each of the loops of your foundation chain (6 sc) and then continue on in the regular pattern up the other side of the band. You should end up with 120 total sc around the band NOT counting row 39. Fasten off. Attach a button to one end.
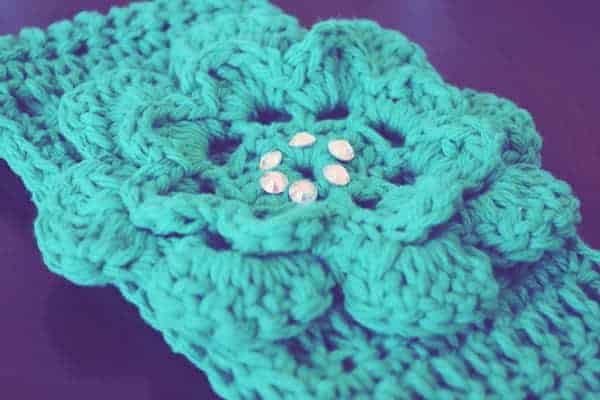
Flower:
I actually used this crochet flower pattern but only up through row 5 because the flower was getting quite large. I attached swarovski rhinestones to the middle with E6000.

If you’re a crochet expert with suggestions on how to improve this pattern, or if you have questions, feel free to let me know.
Looking for more great ideas? Follow me on Pinterest!
Visit bre pea.’s profile on Pinterest.//assets.pinterest.com/js/pinit.js

Oh my goodness! So cute, I'm a little afraid to try this though, I'm not crafty in the slightest
So cute! I'd love to make these in a whole of rainbow of colors for my neices!
I can't crochet at all, but these flower headbands are HOT right now!
~Kim
http://2justByou.blogspot.com
So cute!! I love to crochets. Thanks for sharing and thanks for joining the blog hop. Btw, I am co-hosting a jewelry swap. If you'd like to participate – Bauble Swap!
I am totally new to crocheting but I think I could do this! thanks for the pattern.
this is so cute! i learnt to crochet year ago, can't remember if i can do it anymore!
i found you through the blog hop (still going through my favourite blogs!) and am now following you:)
charlotte
http://inyoureyesphotogandinspo.blogspot.co.uk/
x
I love love all of your crafts!
So, I just found your blog. And I love it. A whole lot.
You are so cute!!!!!!
Would love to have you over on my end, too 🙂
xoxo,
Sierra
Oh, Just Living the Dream
Have never crocheted before and am quite frightened of it! But this looks so good when it's made that I'm half tempted…;-)
Found your blog via the Meet and Greet blog hop and am following now – it looks great 🙂
Michele
http://thingsiwouldloveto.blogspot.co.uk/
This is beautiful! I love the color you chose. 🙂 Found you via the Meet n Greet Blog Hop. 🙂
Oh how I wish I could crochet 🙁 This is awesome!
Your newest follower via GFC Instagram and Twitter. Visiting from the Monday Mingle.
http://www.happykidsinc.blogspot.com
Adorable! Thanks for sharing this free pattern! I'd be thrilled if you'd link up at this week's Off the Hook! I know my readers would appreciate a free crochet pattern 🙂
This is adorable. My husband bought me one for Christmas, but this is cuter and I can make it. Thank you .
WE may have met by chance…but we become friends by choice.
http://simpleesue.com/make-one-new-recipe-a-week-french-onion-soup-grilled-cheese-sandwich
So cute.. Ty for sharing the free pattern ~!
On the rows where you are going to DC, it should say: ch 3, turn, DC in 2nd SC and in each across. I knew what you meant, but a novice crocheter might read DC in 2nd st from hook to mean the 2nd of the ch 2 that was part of the turning chain.
You are SO RIGHT. Thank you for catching that!
how do you attach the flower to the headband
and the button too!
I would like to make this for my daughter, the size says for a 22 to 23 inch circumference, if I wanted to measure her head would it be the way the headband would be worn, or just around the head normally? I did measure the way the headband would be worn and hers is about 20 inches. If I could get some help making this for my daughter I would be so grateful!! She wants one just like this (and to be honest it's the best one I've found! Thank you so much
I like to measure where the headband will actually sit. If you need to make it smaller, get rid of a few of the middle rows, but just make sure you get rid of 2 at a time (so either don't do row 31 & 32, or 29, 30, 31, and 32). Does that make sense? You could also just do the pattern how it is and she could button it up tighter. That's the benefit of not making an actual button hole because it adjusts easily. Hope that helps!