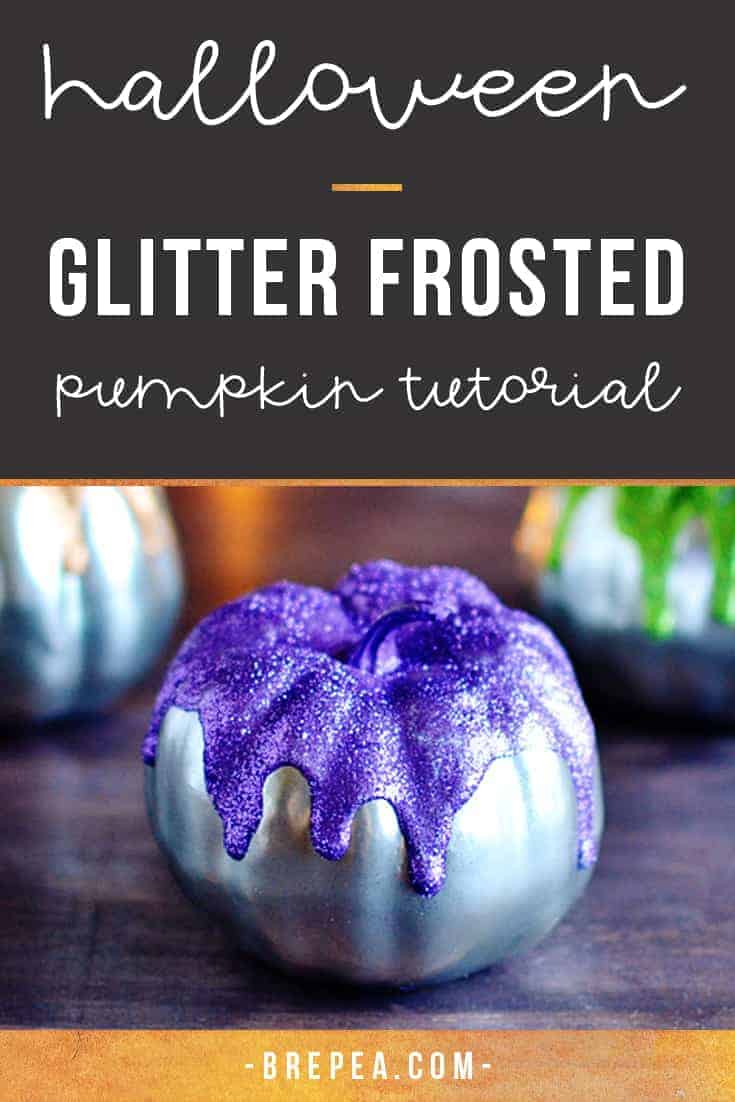
DIY Metallic Glitter Frosted Pumpkins


DIY Metallic Glitter Frosted Pumpkins
You’ll need…
- Plastic mini pumpkins *they can’t be real pumpkins if you’re going to spray paint them like I did, or else they will explode
- Apple Barrel Multi-Surface Satin Acrylic Paints
- Mod Podge
- Glitter
- Metallic Spray Paint
- Foam Brush

STEP ONE
Spray paint your mini pumpkins and let them dry thoroughly. Like I mentioned above, do not spray paint real pumpkins unless you want pumpkin guts all over your house. The chemicals in the spray paint react with the skin of the pumpkin and create a gas inside that will eventually cause the pumpkin to rupture.

STEP TWO
Using your Apple Barrel Multi-Surface Satin Acrylic Paints and a foam brush, paint the stem of the pumpkin and the out towards the edges. Allow the paint to dry thoroughly before proceeding to the next step. This is my favorite acrylic paint because it works on so many surfaces: tin, terracotta, paper mache, canvas, wood, plaster, rigid plastic, fabric, concrete, glass, and ceramics. Plus it has a satin finish and it’s great for both indoor and outdoor projects.


STEP THREE
Paint the top of the pumpkin generously with Mod Podge. I encouraged drips down the sides by applying it very thick down the sides. On another note, did you know they now make Glow-In-The-Dark Mod Podge? It’s seriously amazing.

STEP FOUR
While the Mod Podge is still wet, sprinkle with glitter matching the color of the paint. Make sure you carefully flip the pumpkin upside down to get the under side of the drips.

You’ll want to let your pumpkins dry overnight before you handle them. Ever since Bean saw me working on these she has been begging to hold them. Patience, my dear child 😉


I love the pumpkins.LOL! they are adorable.
OMG these are super cute!!! Let’s face it anything glitter is right up my alley!!! Also thanks for the warning on not using fresh pumpkins!!!
This is great! I can’t wait to try them with my daughter.
I love these! They would be such a fun project for my daughter and I to do this Halloween! I think the silver makes them so unique and fun 🙂
I’m also a fan of going all out for each holiday!! Love these pumpkins. Definitely considering trying this method!
I love pumpkins! I get so excited the beginning of September because then it begins. These are cute, I’ll have to grab a couple pumpkins for our Halloween parties.
Such a great DIY and easy to make. Getting into Fal this year will be a pice of pumpkin pie!
D, xo || from https://livedreamcreate-d.com
So pretty and simple! I absolutely love the pumpkin with the orange glitter on top… so perfect 🙂