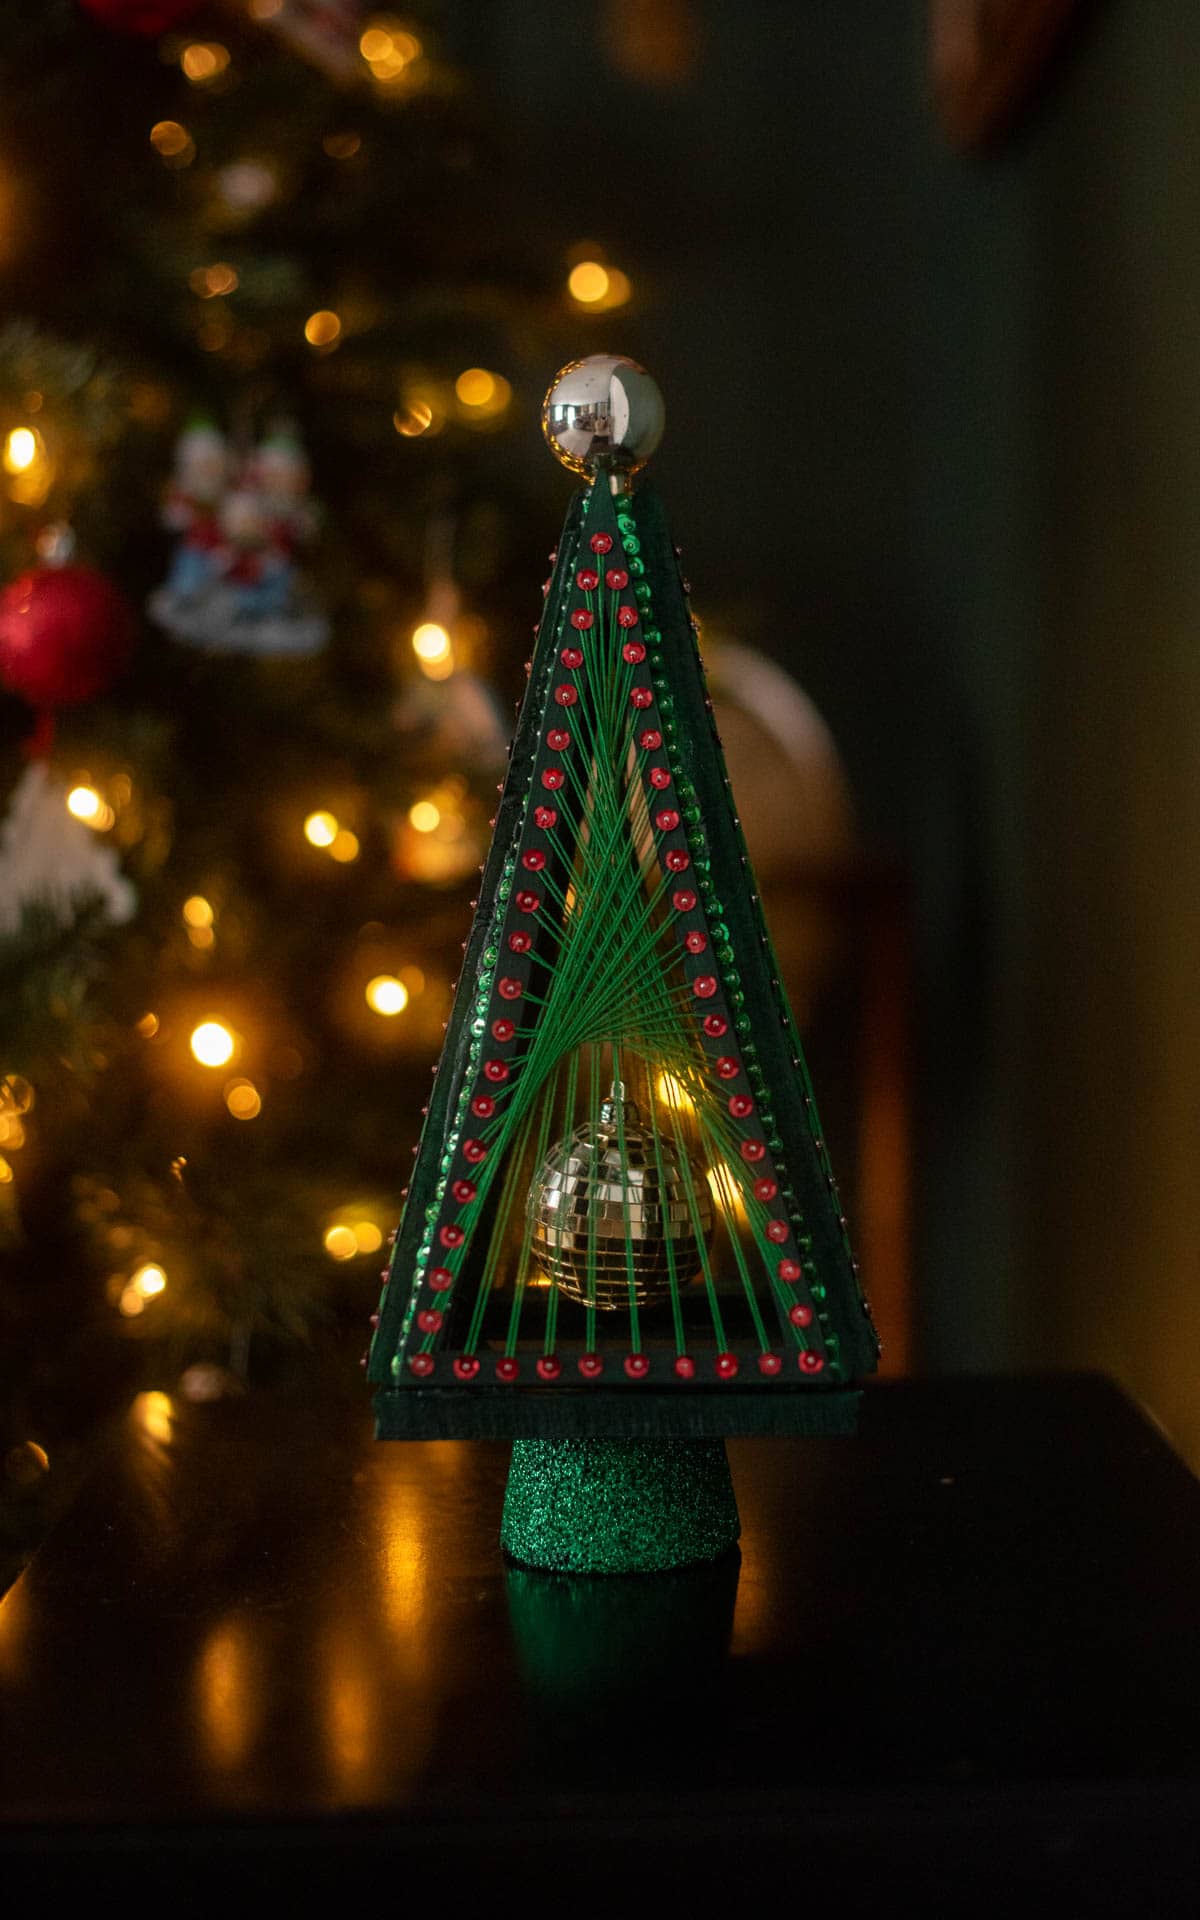
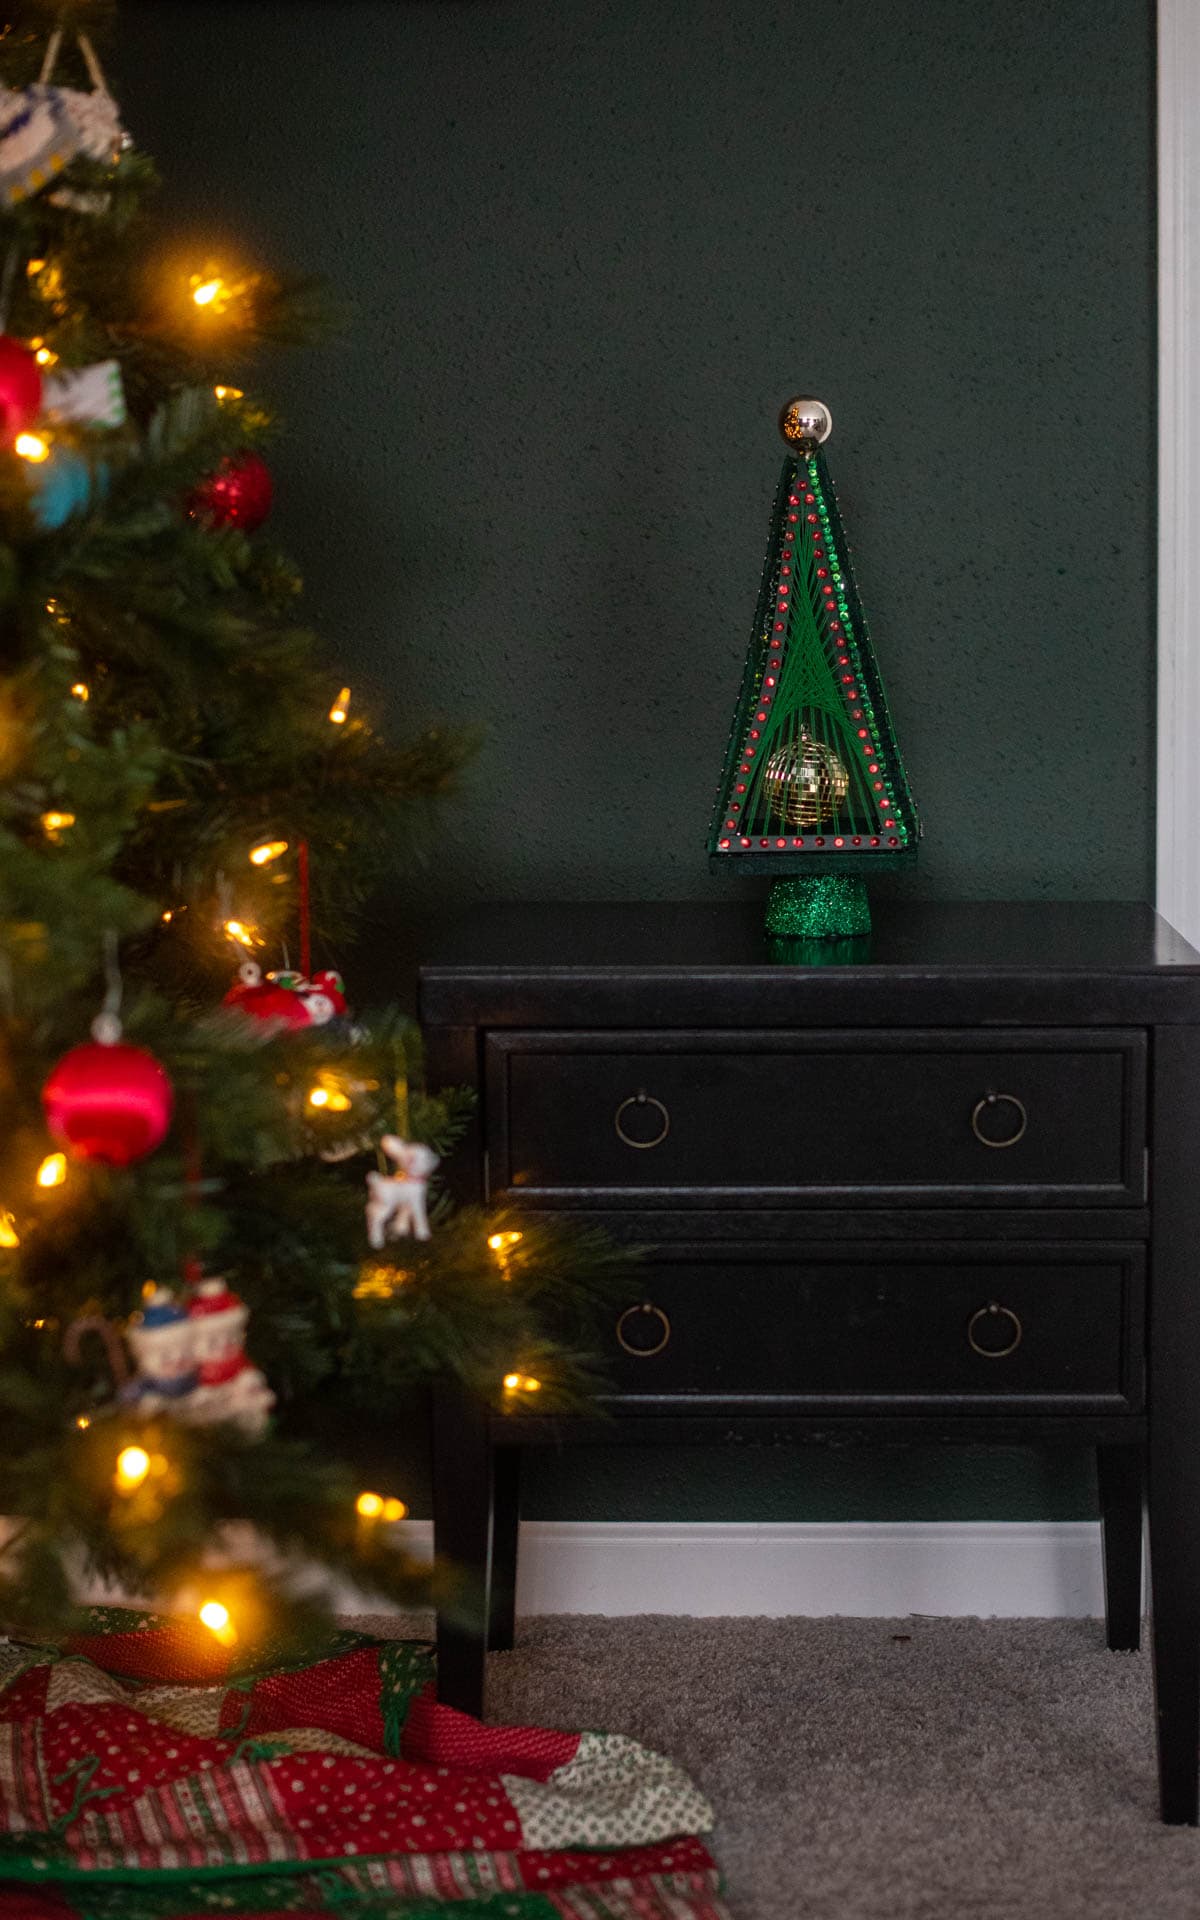
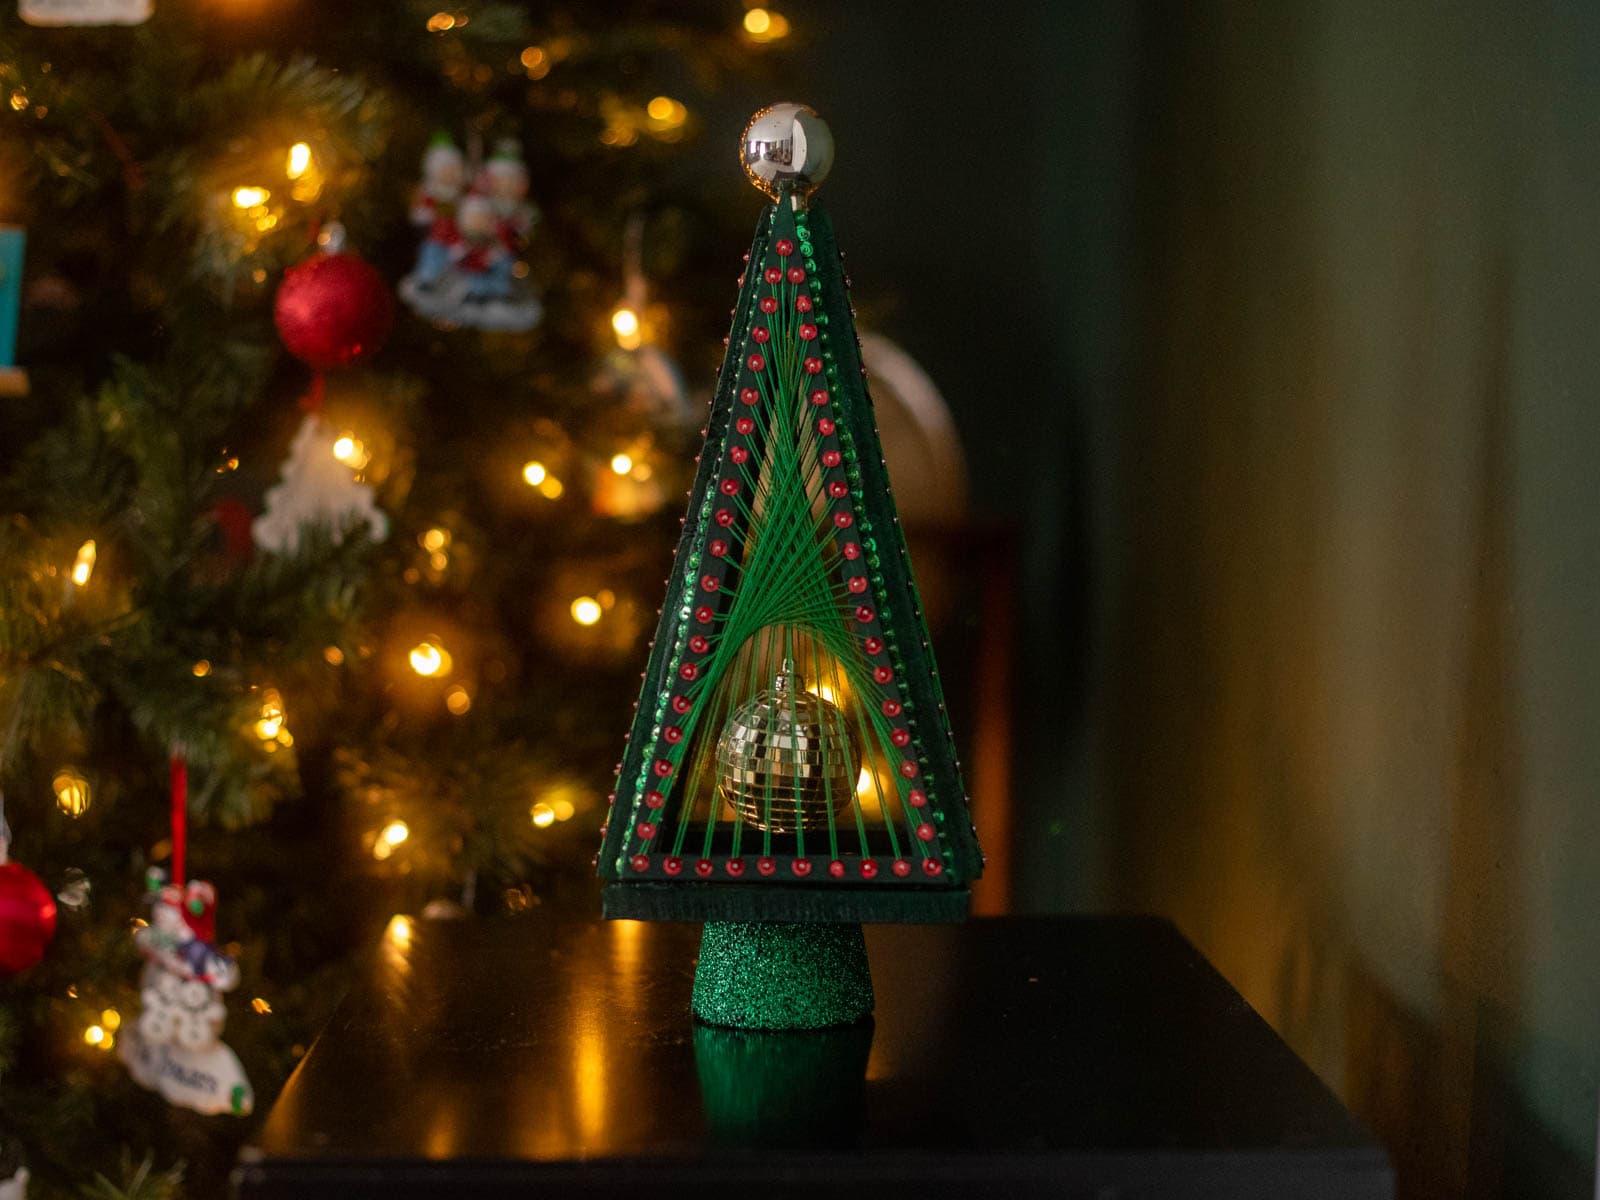
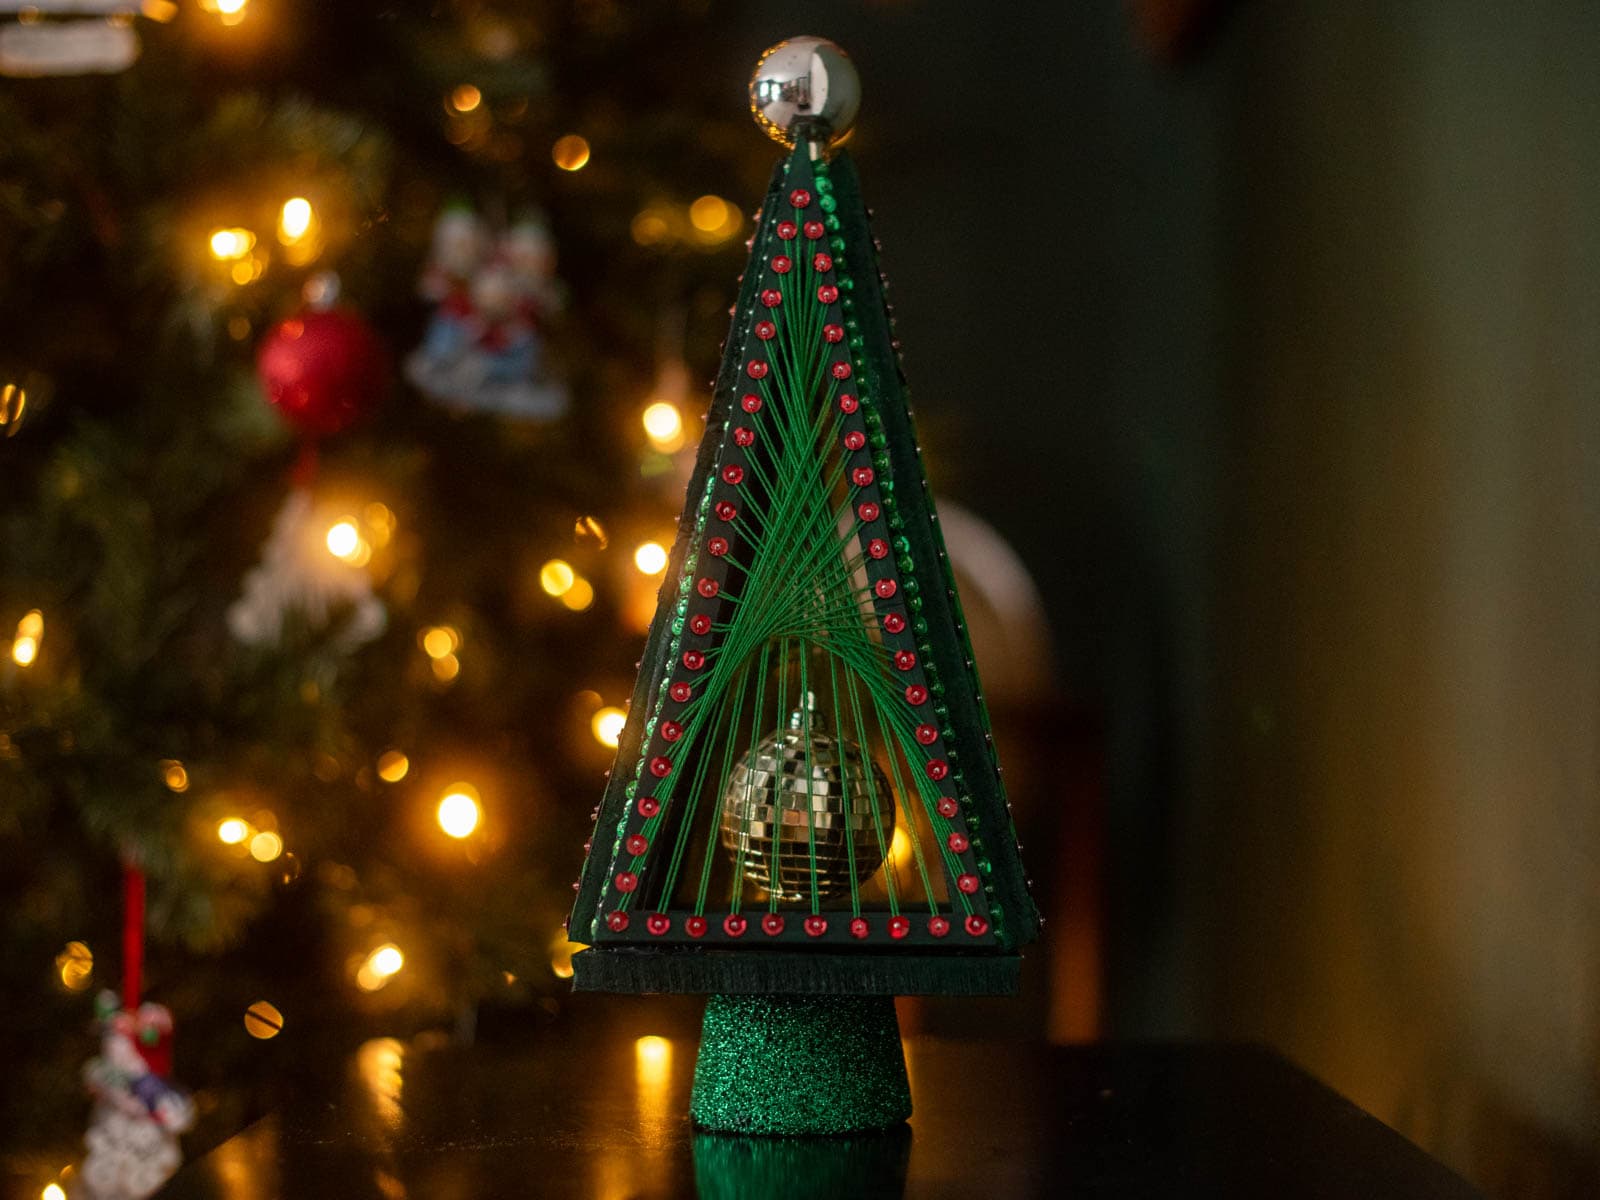
Looking for a nostalgic holiday DIY? This string art Christmas tree tutorial is inspired by a true vintage Christmas craft from the 1970s and is easier to make than it looks!
I stumbled across a Christmas tree string art craft from a 1976 issue of Crafts n Things and instantly knew I needed to recreate it.

I see string art in vintage and antique shops all the time and have always wanted to try my hand at making my own but was a little intimidated. The effect it creates looks so cool, but it also looked hard to do. Boy was I wrong!
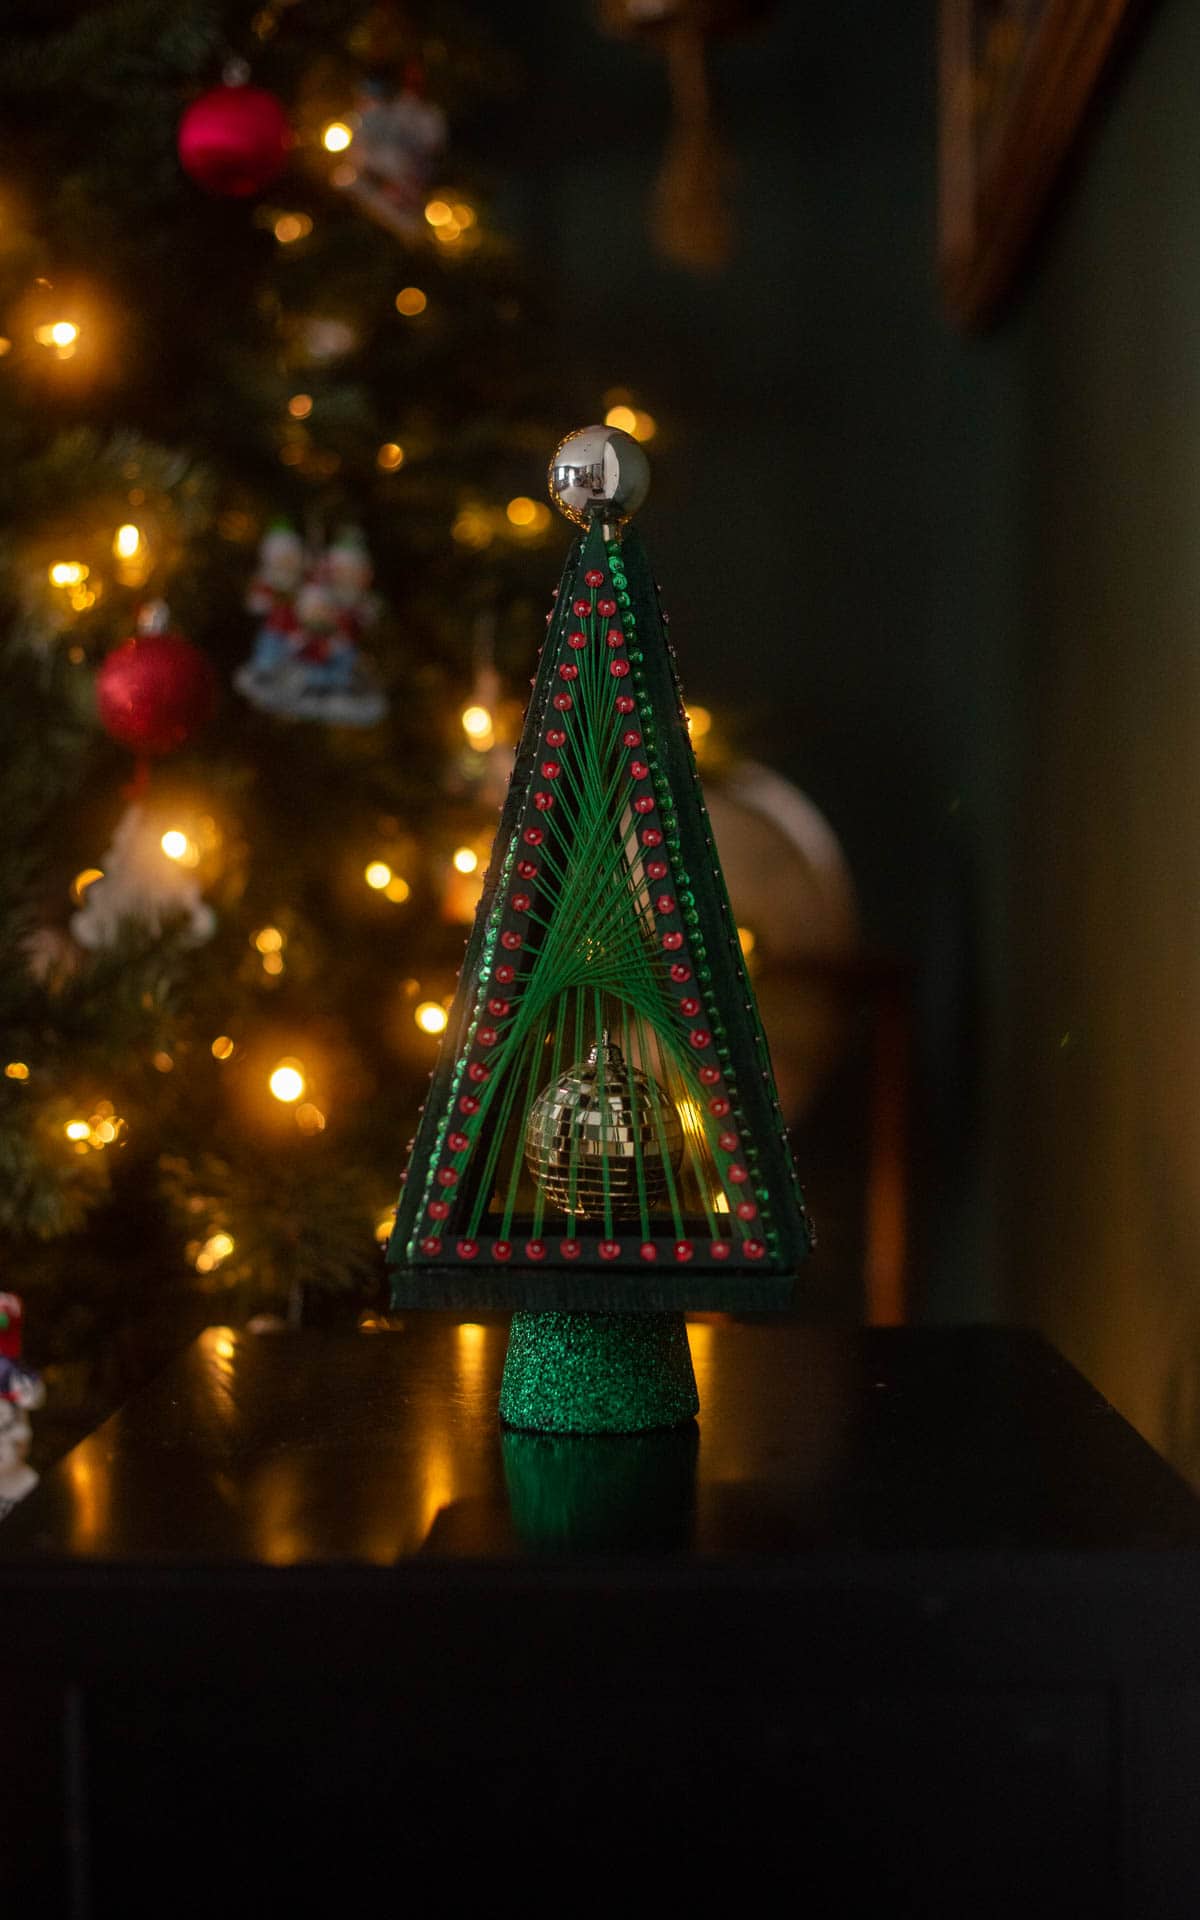

This string art Christmas tree is a perfect example of a vintage Christmas craft that looks intricate but is surprisingly beginner-friendly.
Prefer to watch me make this before reading the post? You can see the full video tutorial for this vintage string art Christmas tree on TikTok here.
Vintage String Art Christmas Tree Tutorial Snapshot
EASE: the string art itself is super easy to do!
PROS: really cool look for not a ton of effort
CONS: cutting foam board can be difficult and time consuming
WOULD I MAKE THIS AGAIN? for sure!
Vintage String Art Christmas Tree Supplies
This post contains affiliate links. If you make a purchase through one of these links, I may earn a small commission at no extra cost to you. Thanks for supporting my vintage craft obsession!
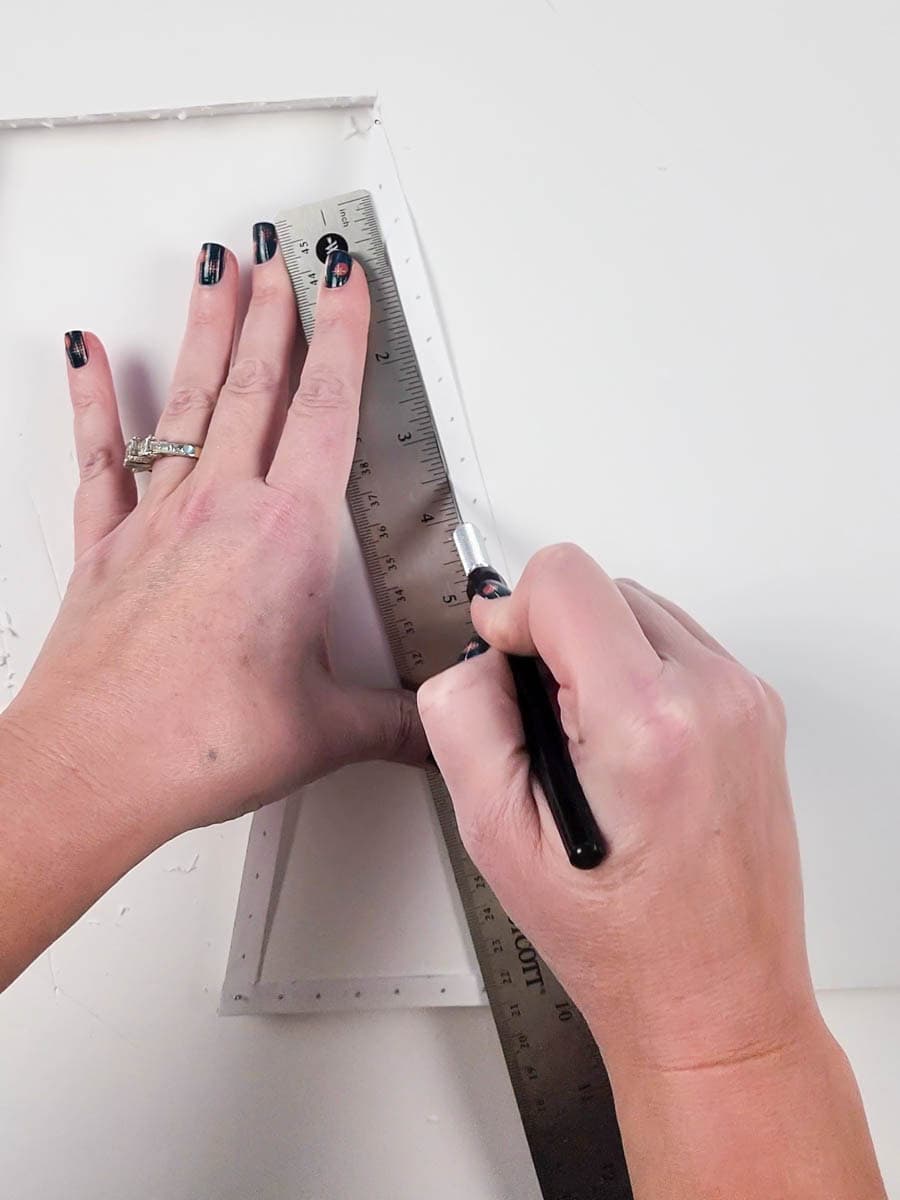
Step 1: Draw or print your triangle piece pattern
Take a ruler, pencil, and piece of paper and draw a triangle 11” high and 5” wide at the base with ½” thick sides.
Or, download my free printable pattern here!
Note: so that the pattern was easily printable on a single sheet of paper, the triangle will be slightly smaller than the original measurements if you are drawing it by hand.
If you’re drawing the pattern yourself, mark where your sequins will go next. Draw 3 dots in the center of each corner. Then, evenly space more dots so that there are a total of 10 along the base of the triangle from corner to corner, and 21 dots on each side from corner to corner.
Once your pattern is either printed or drawn out, cut out your pattern and remove the center of the triangle.
Step 2: Cut out your foam board pieces
Place your triangle pattern on the ½” foam board and secure each corner with a pin. Then, using a ruler to keep your cut lines straight, cut out your triangle pieces using an exacto knife.
Tip: Don’t try to cut through the board in one go or you’ll end up with really jagged edges (which, despite my best efforts, happened a bit to me). If that happens to you, don’t worry because we’ll hide all our sins with a few tricks later on.
But trust me on this, make life easier for yourself by easing your way through the board with multiple passes. If, like me, you struggled a bit to keep your edges smooth, a little sanding helped a bit.
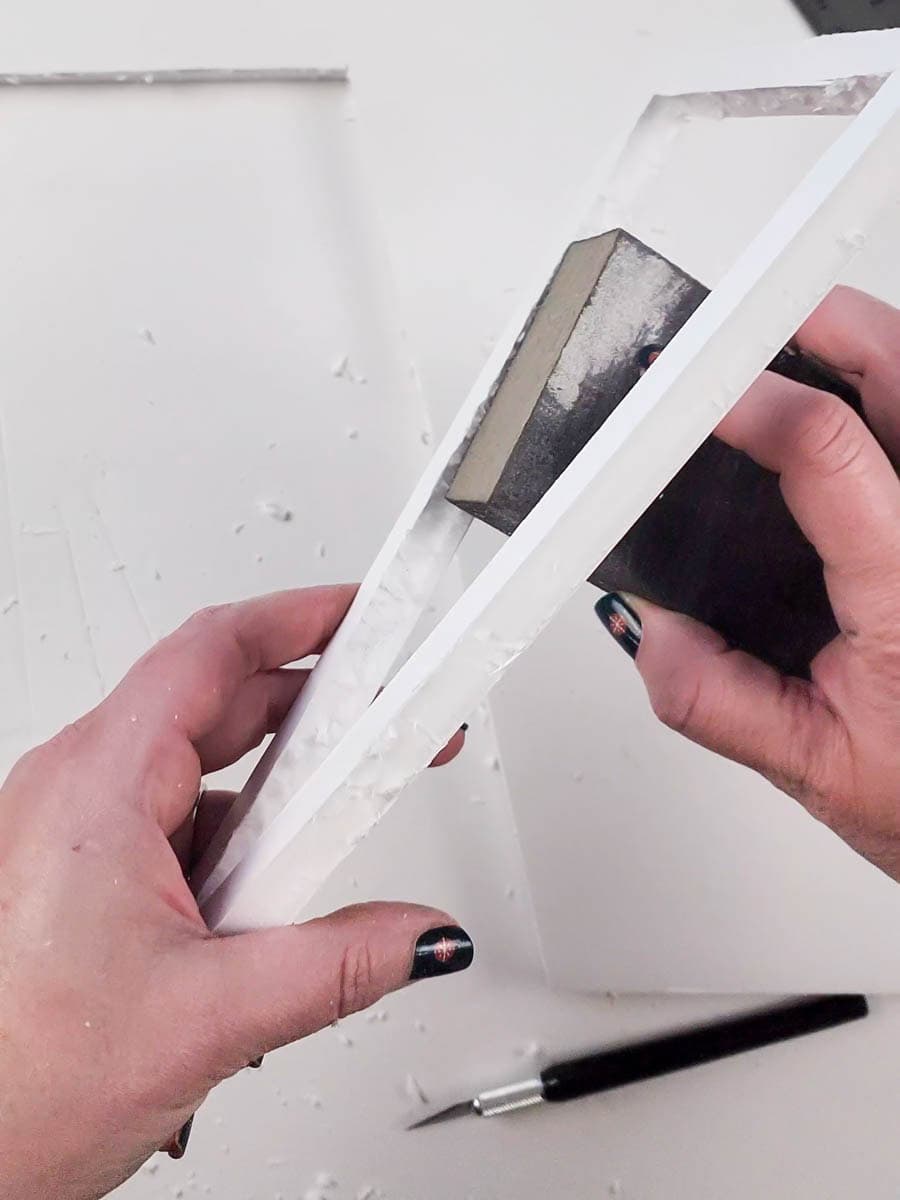
Repeat this process until you have 4 triangle pieces.
Then, cut out a 5 ½” foam board square for the bottom of the tree. Note: if you’re using my free printable pattern, cut out a 5″ foam board square instead.

Step 3: Transfer the sequin pattern to the faces of the triangle pieces
Grab your pattern and attach it to a triangle piece by placing a pin in each corner. Then, use another pin to puncture the design through each dot onto the foam board.
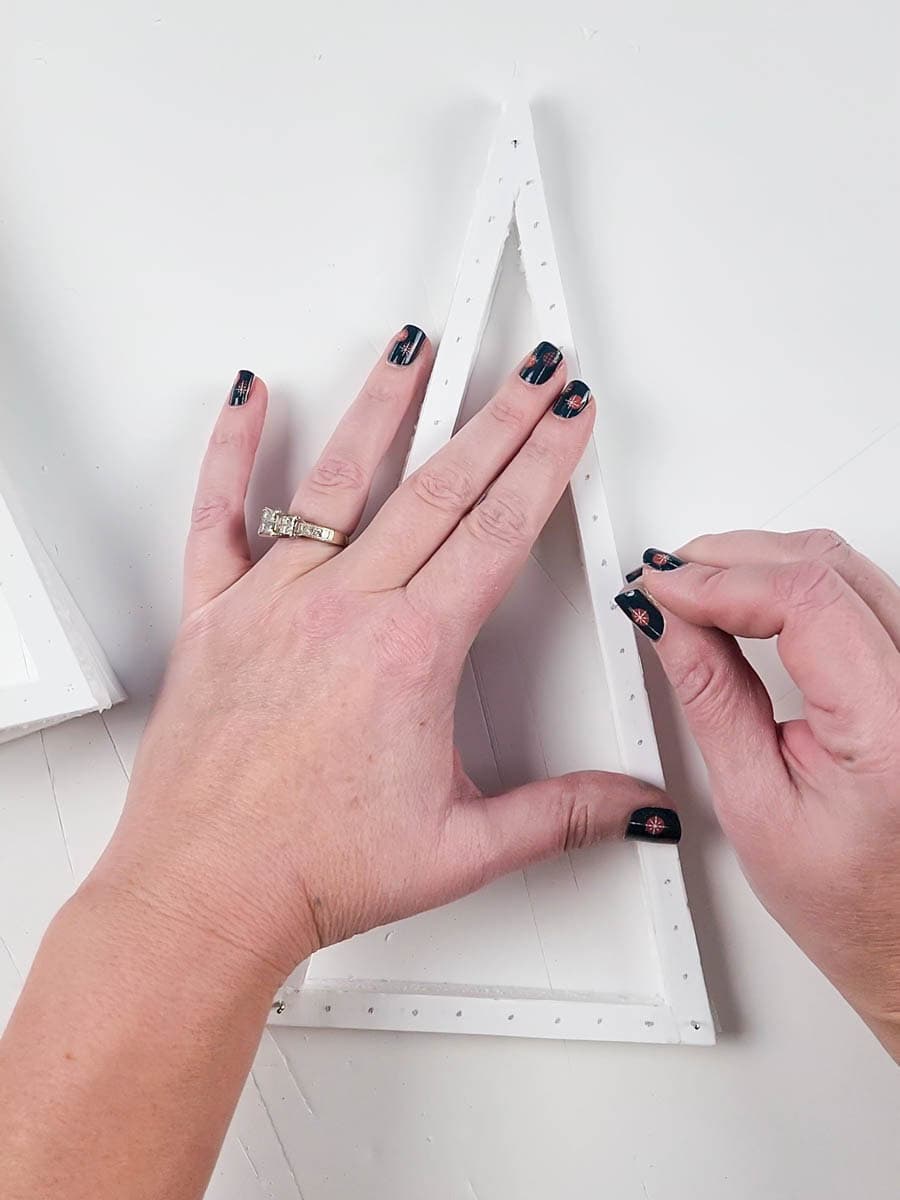
Once all of the dots are transferred, remove the pins and pattern and repeat with each triangle piece.
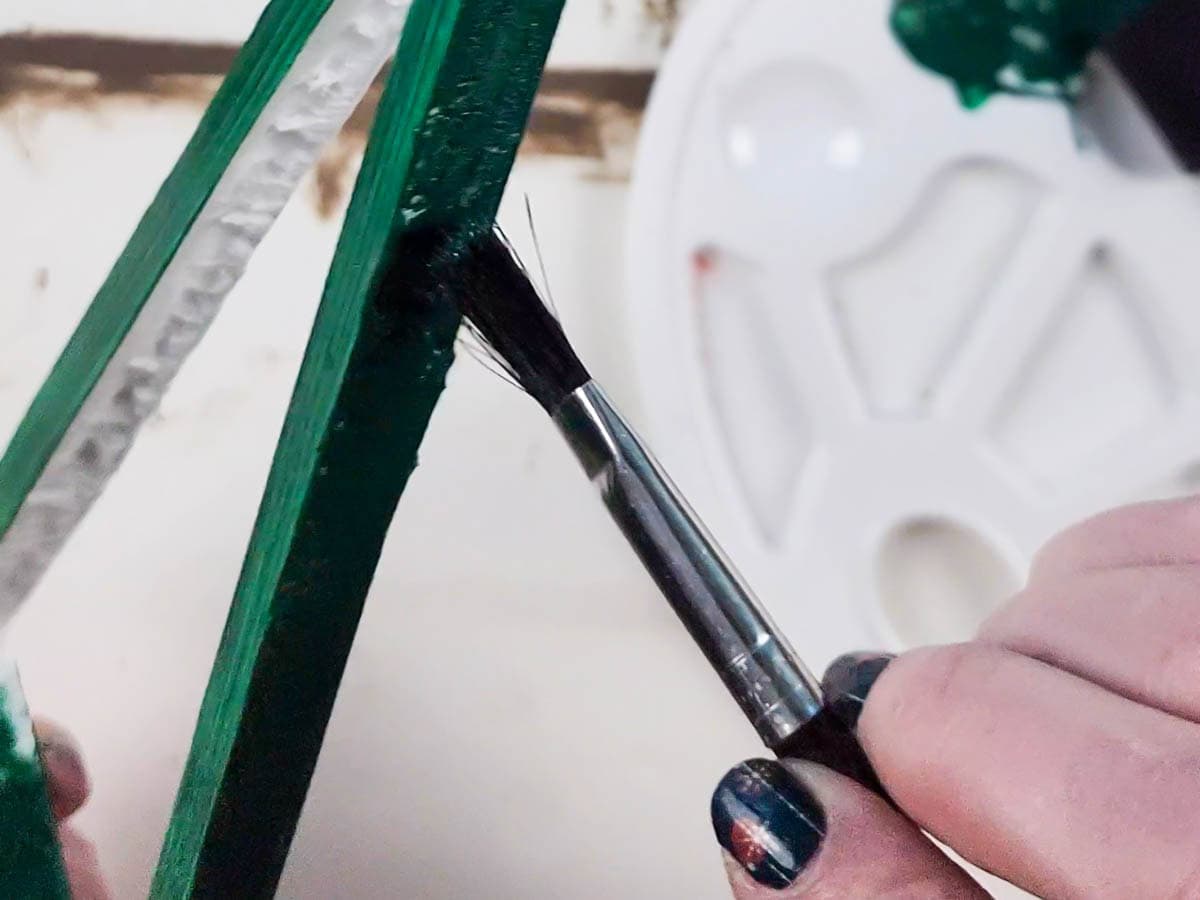
Step 4: Paint the foam board pieces
I wanted my tree to be green (plus this helped camouflage the rough edges that I couldn’t seem to avoid) so I gave all of my foam board pieces a few coats of green acrylic paint making sure to let them dry thoroughly between coats.
The bristle paint brush helped get into the crevices of the foam board on the edges and blend them in.

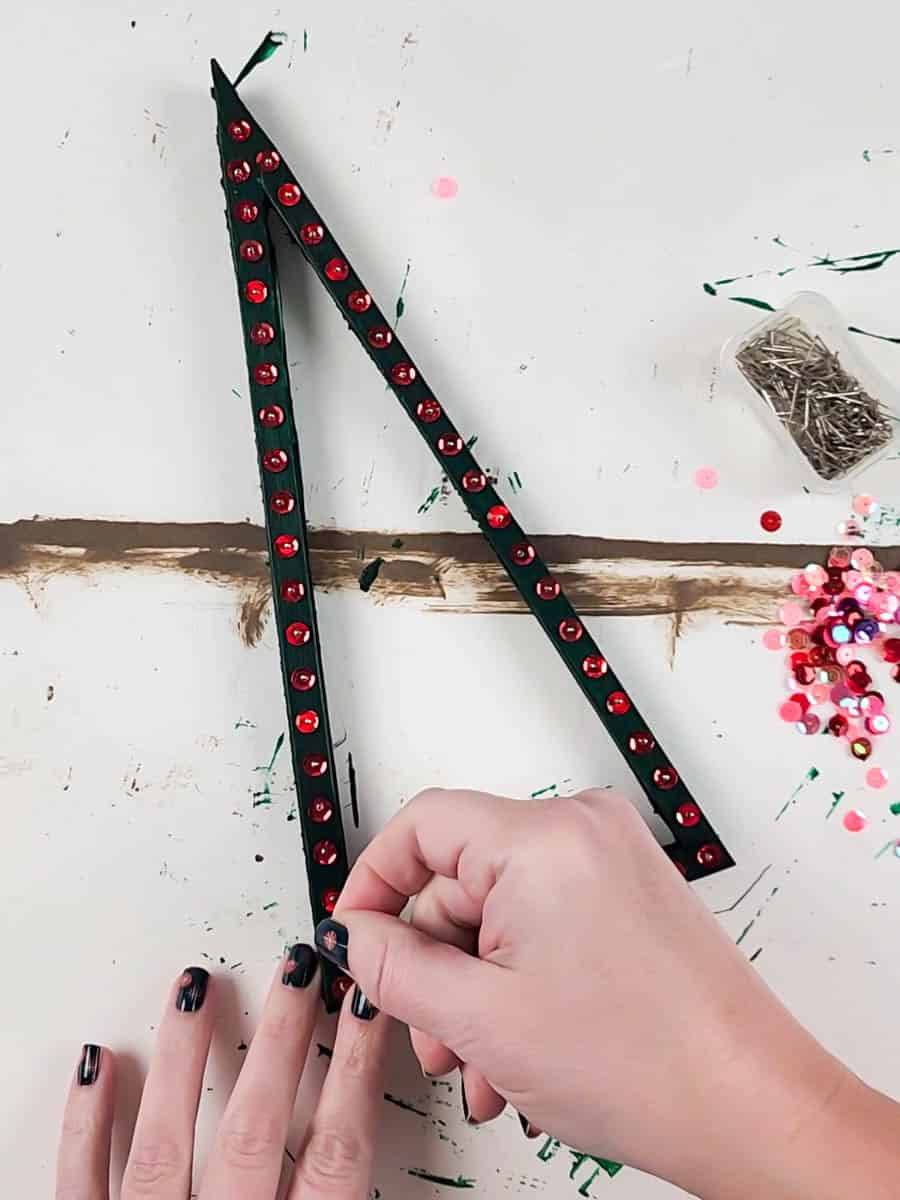
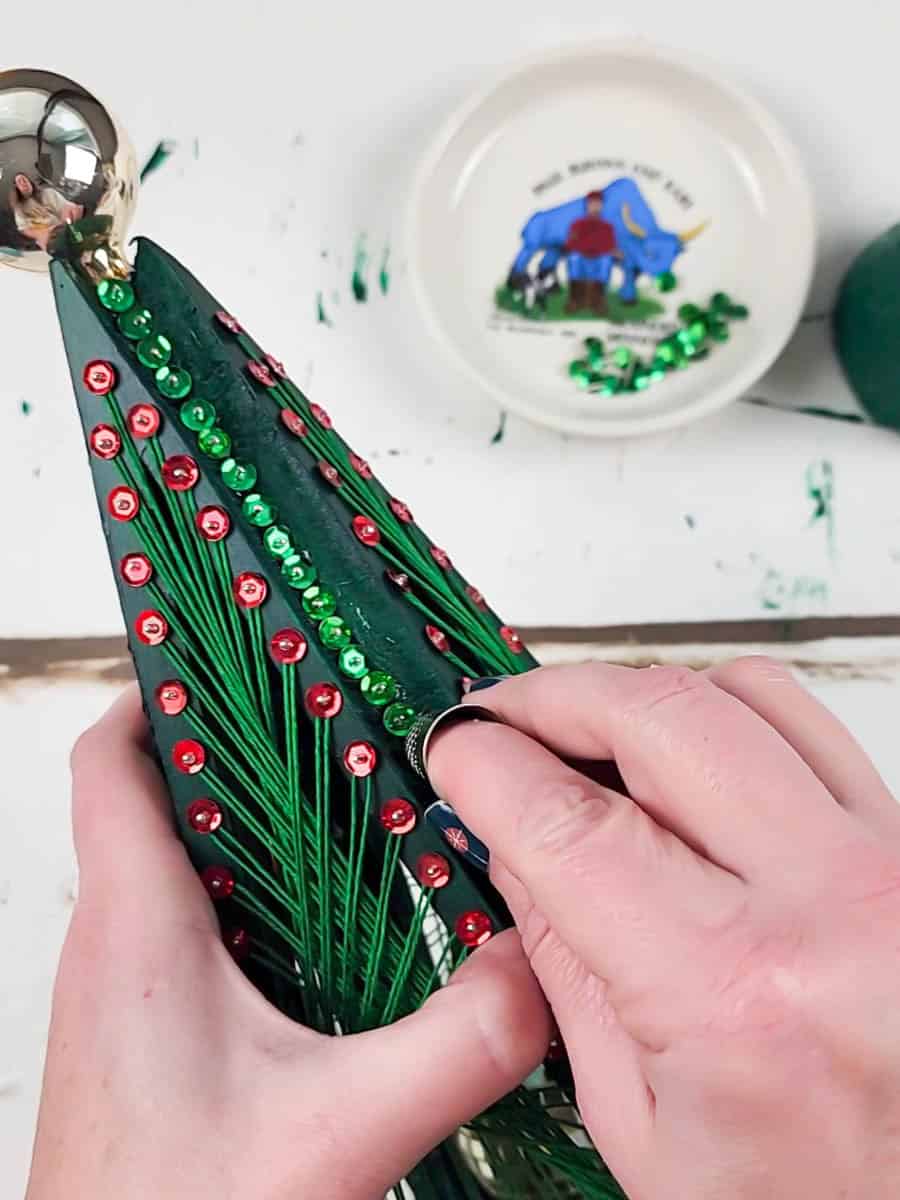
Step 5: Add pins, sequins, and beads to the faces of each triangle piece
Layer a bead first and then a sequin with the cup facing out onto a pin.
Find the holes that you transferred earlier onto your triangle foam board pieces and stick a bead and sequin pin through each one around the face of the triangle. Repeat for all 4 of your triangle pieces.
Step 6: Wrap the crochet thread around the pins
Now it’s time for the real fun part! Knot one end of your crochet thread to the bottom left corner behind the sequin. This will be the start and end of your string art pattern.
Then, count 5 sequins down from the top on the right side and wrap the string around that pin. Return to the bottom and now wrap the string around the sequin to the right next to the pin you started at.
Return to the top and now wrap the string around the 4th sequin from the top corner (working your way up the triangle). Continue around the entire triangle until you end up back at the start.
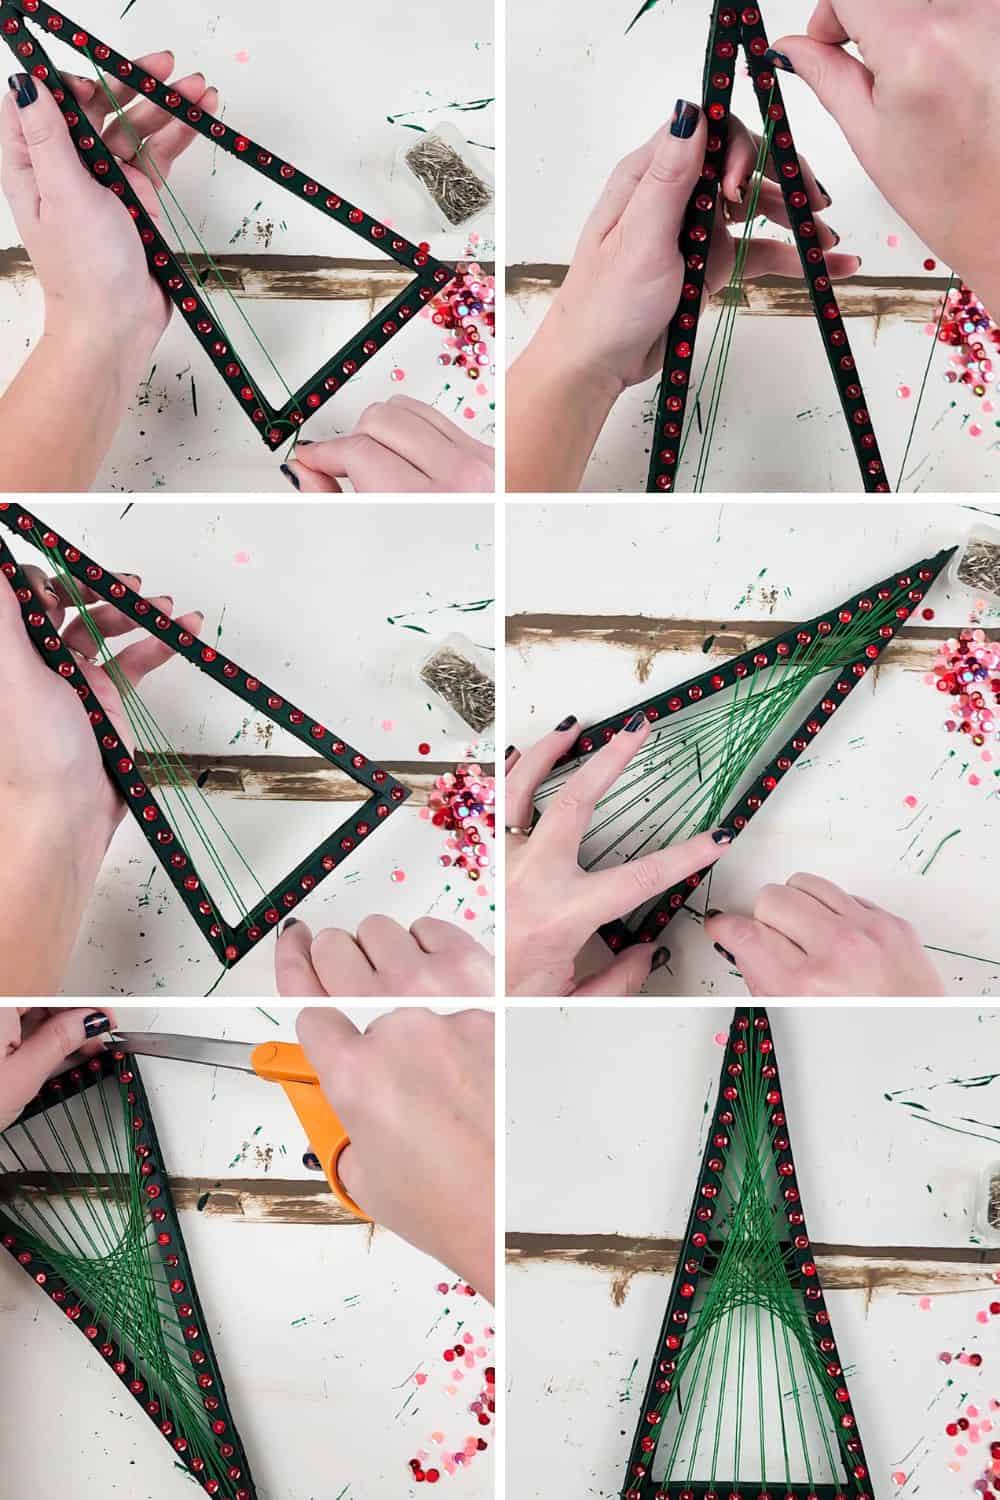
Tip: Make sure to always wrap the string around the same side of the sequin as you work your way around. I decided to always wrap around the right side of the sequin in a counterclockwise direction.
Also, pull the string tight but not too tight or it will warp the triangle. I learned this the hard way! Don’t worry if there’s some slight warping because we’ll be fixing that in a later step.
Once you finish back at the first pin, knot the string, cut, and secure with some clear tacky glue hiding the ends under the sequin.
Step 7: Assemble the tree
Flip your triangle side pieces over and attach them to each other using some scotch tape making sure that the bottoms and tops line up with each other. This is mainly to just hold the triangles together while you secure them with hot glue later.
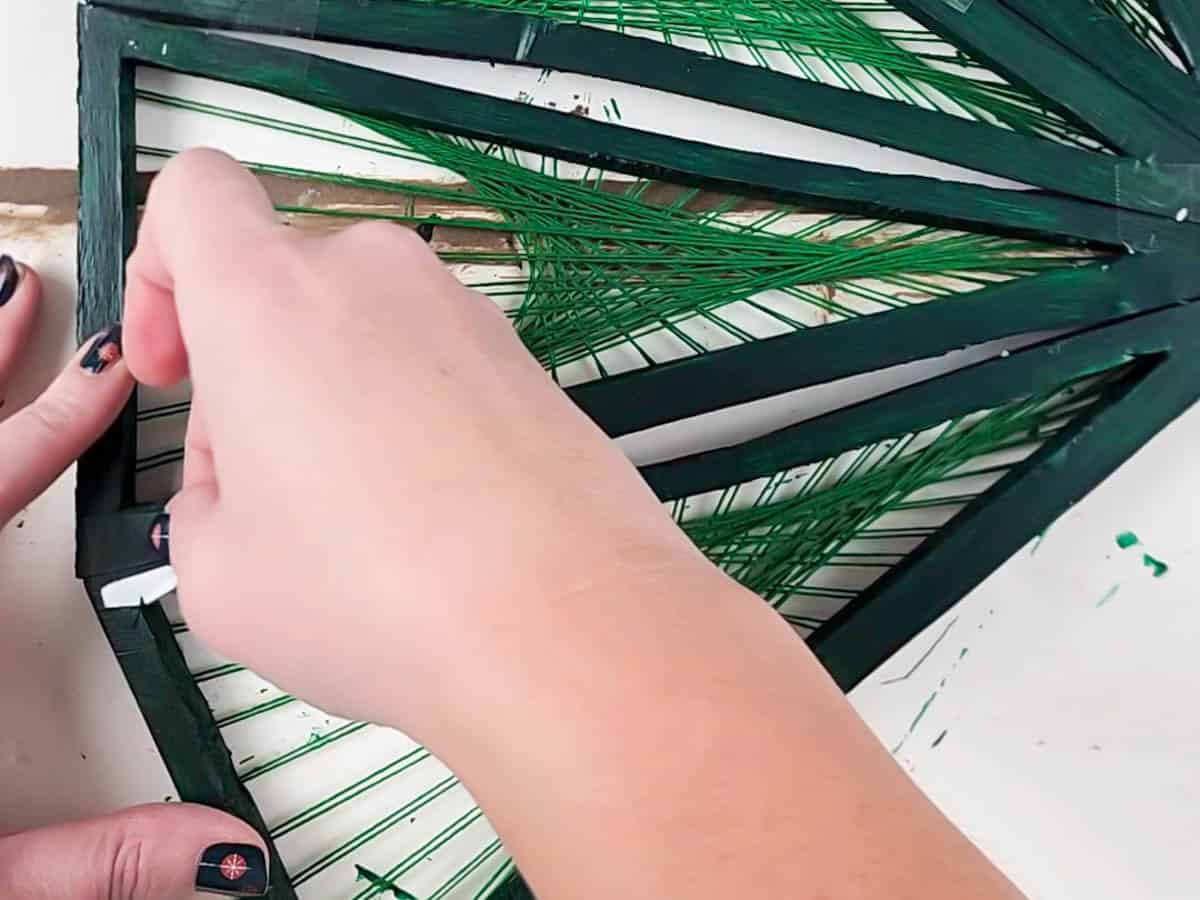
Flip them up and arrange them in a square making sure the opposite pieces are sitting as parallel to each other as possible. Then, use hot glue to firmly secure the sides together.
I used the end of my exacto knife to smooth the seam over while the glue was still hot so I didn’t burn the crap out of my hands.
Step 8: Attach the ornaments
Take a piece of the crochet thread, loop it through your larger sized ornament, then tie the ends together longer than the length of the tree with a double knot.
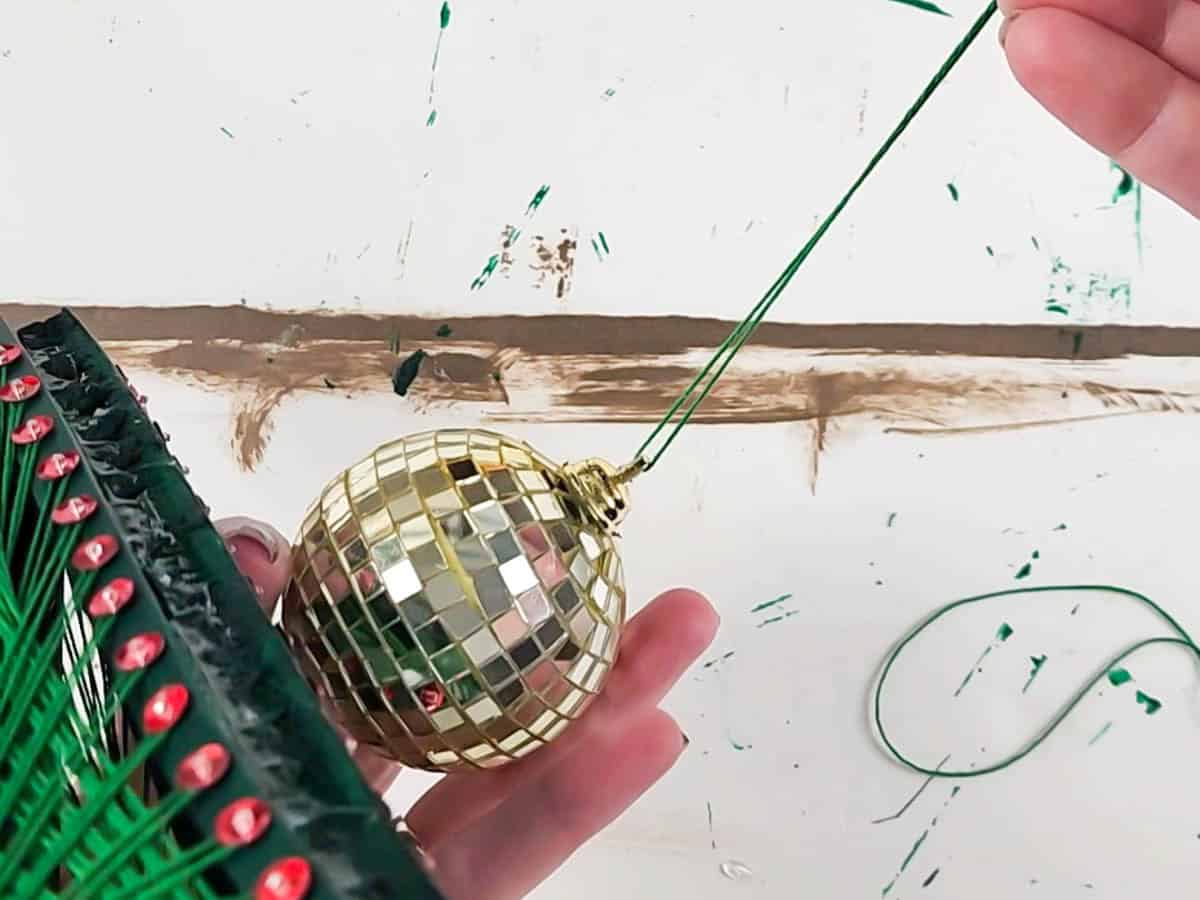
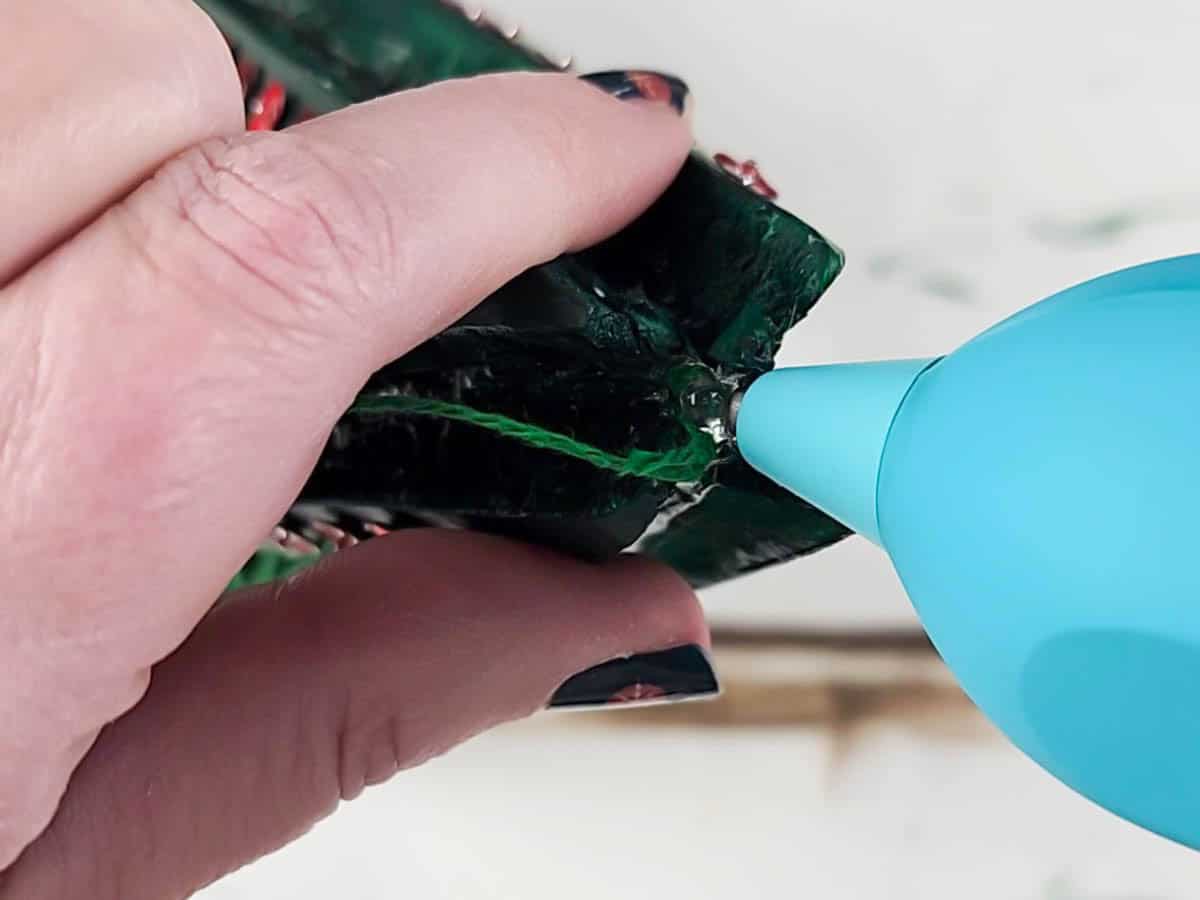
String the knotted end of the thread through the inside of the tree and out the top where there should be a hole. If the hole is too small to do this by hand, you can use a tapestry needle to thread it through.
Decide how low you want your ornament to hang (I wanted mine to peak out where the string art started to arch on the sides) and secure it with plenty of hot glue at the top.
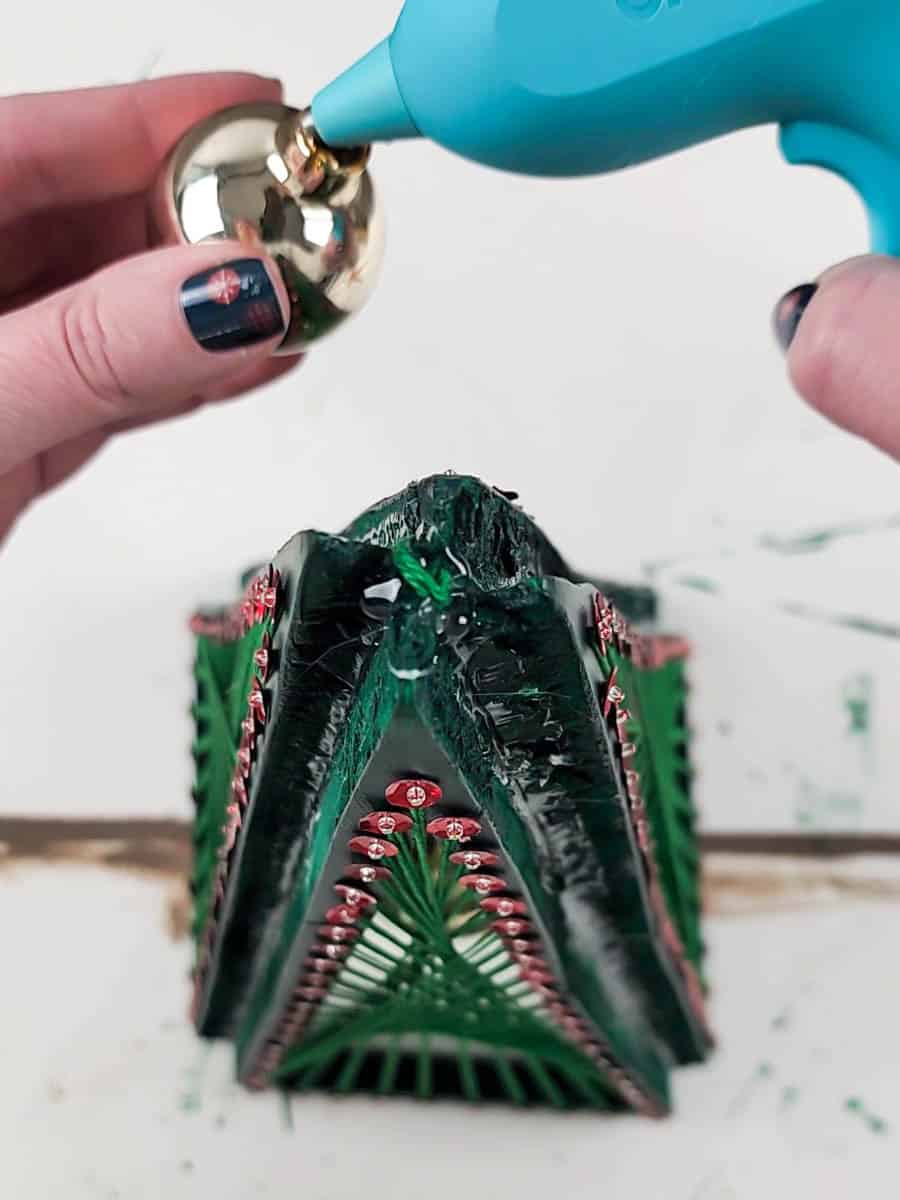
Then, take your smaller ornament, remove the hanger, and attach that to the top of the tree with hot glue pressing down so that it sits in the middle of the points of the triangles.
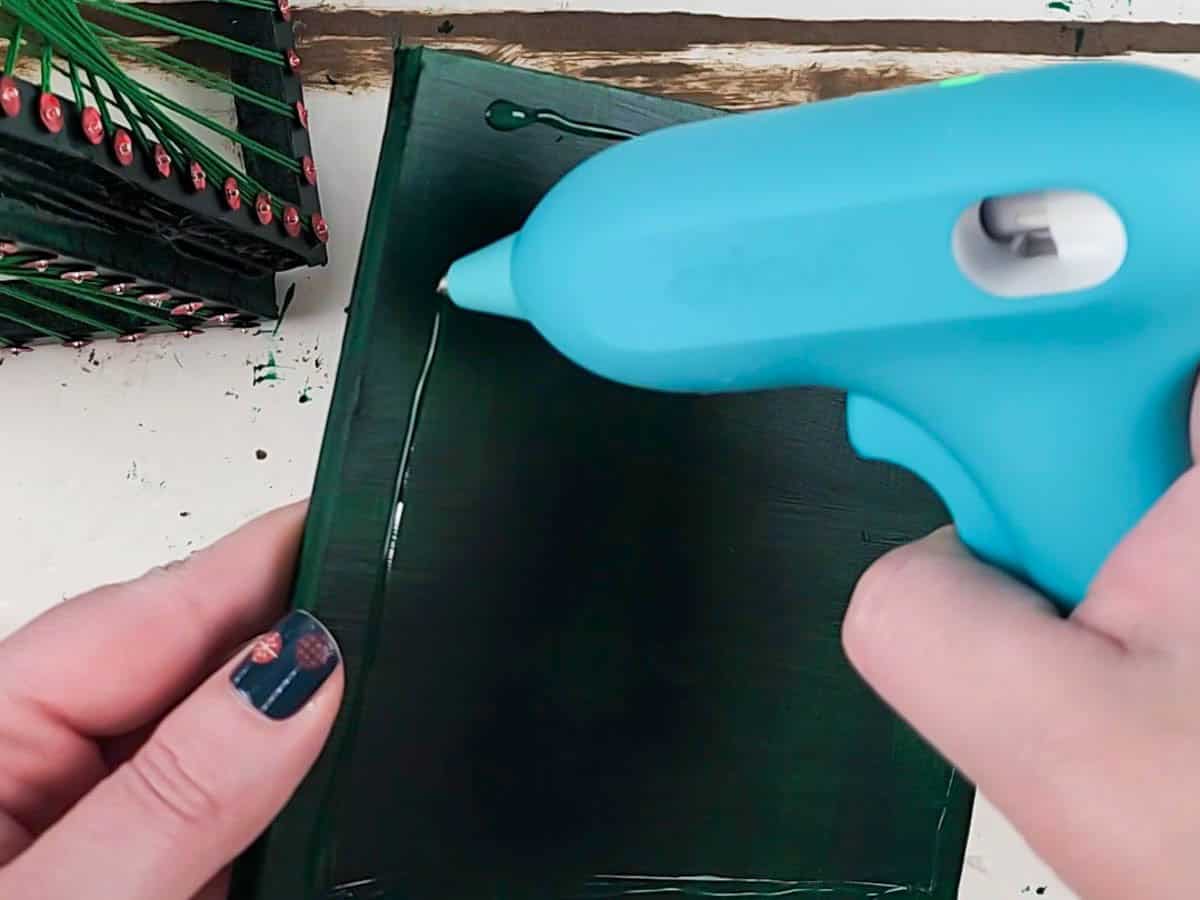
Step 9: Attach the base
Now you’ll grab your 5 ½” foam board piece (or 5″ foam board piece if using my free printable pattern) and attach it to the bottom of your tree with hot glue. Press the tree down gently so that each edge attaches without leaving any gaps.
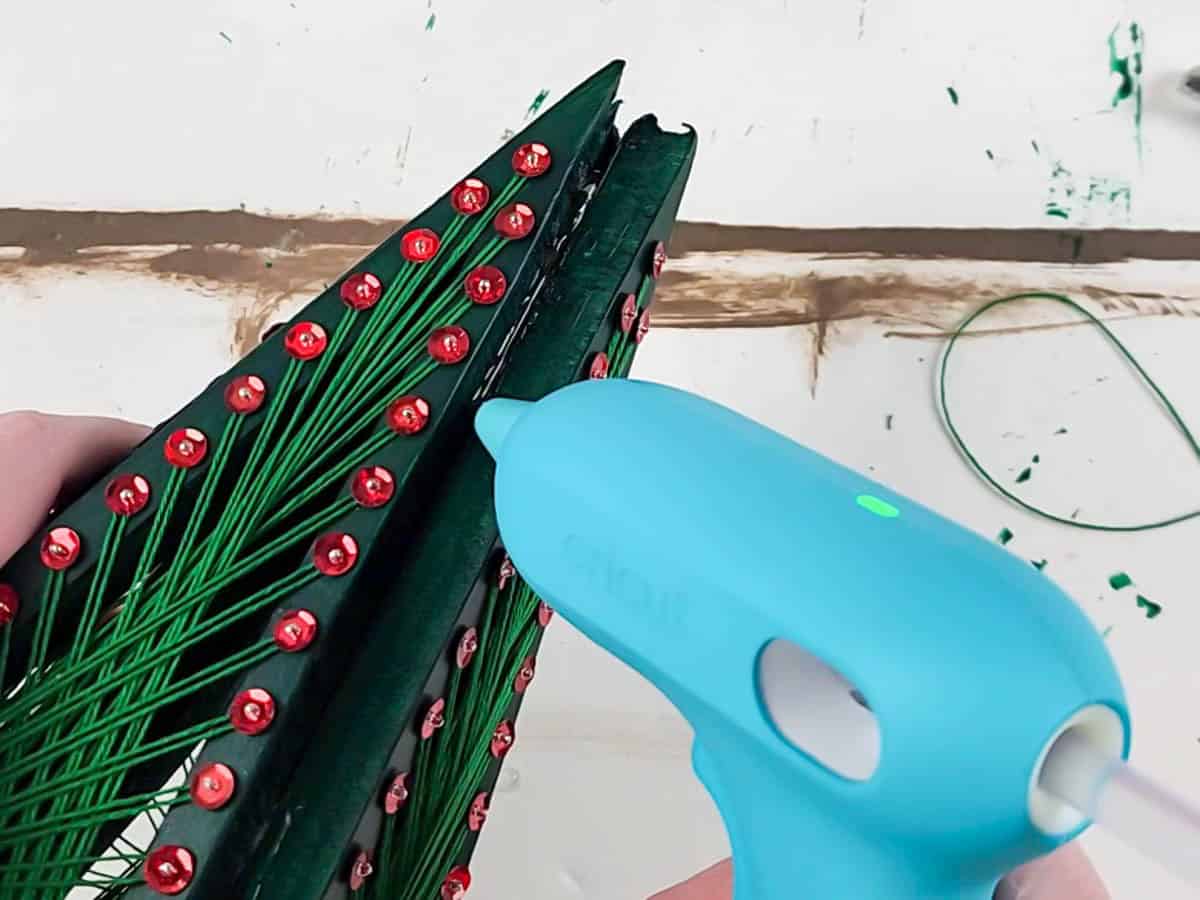
Step 10: Attach sequins to seams
Here’s where we hide all our sins! Grab more sequins, beads, and pins. Attach a bead and sequin to each pin as before. Then, working from the top of each seam to the bottom, insert a pin covering the seams between each triangle piece.
I got smart here and started using a thimble to save my fingers. I used approximately 36-40 pins for each edge, making sure to insert them so the sequins didn’t overlap but sat right next to each other.
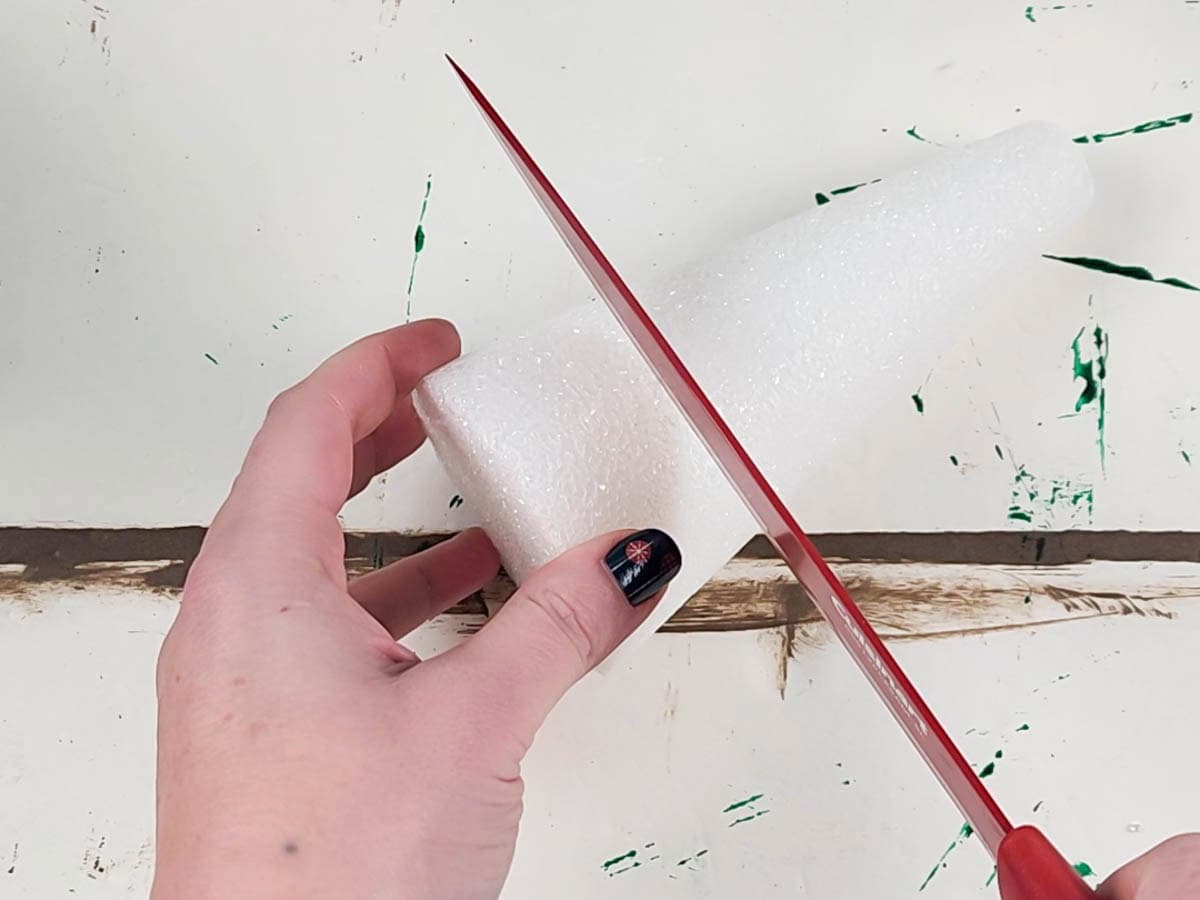
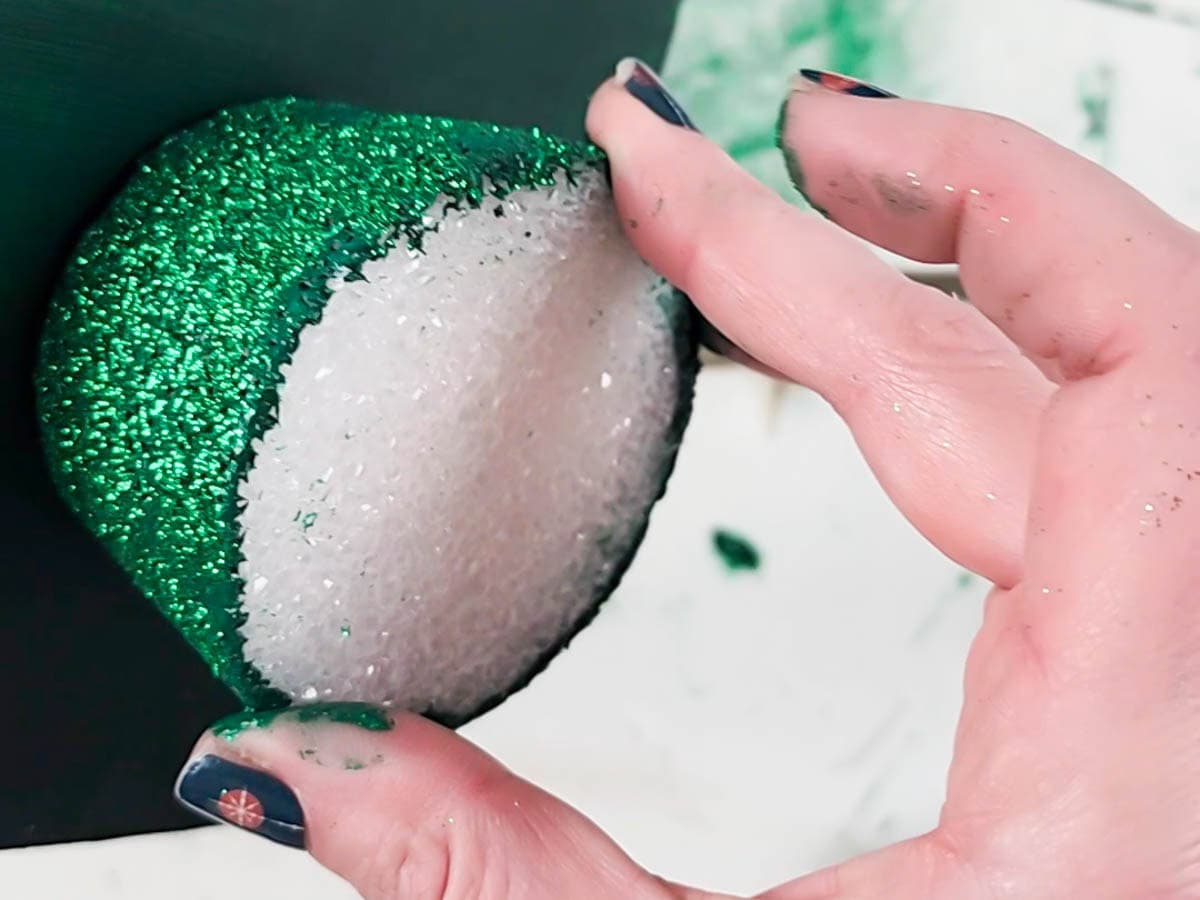
Step 11: Make the glitter base
Finally, take your small styrofoam cone and using a knife (I used a kitchen knife), cut off the top leaving approximately a 1 ½” cylinder.
Take your acrylic paint and give it a thick coat. Then, to cover the holes of the styrofoam that the paint can’t get to, sprinkle with glitter while the paint is still wet and tap to remove the excess. Let that dry completely.
Finally, attach the cylinder to the bottom of the tree using hot glue.
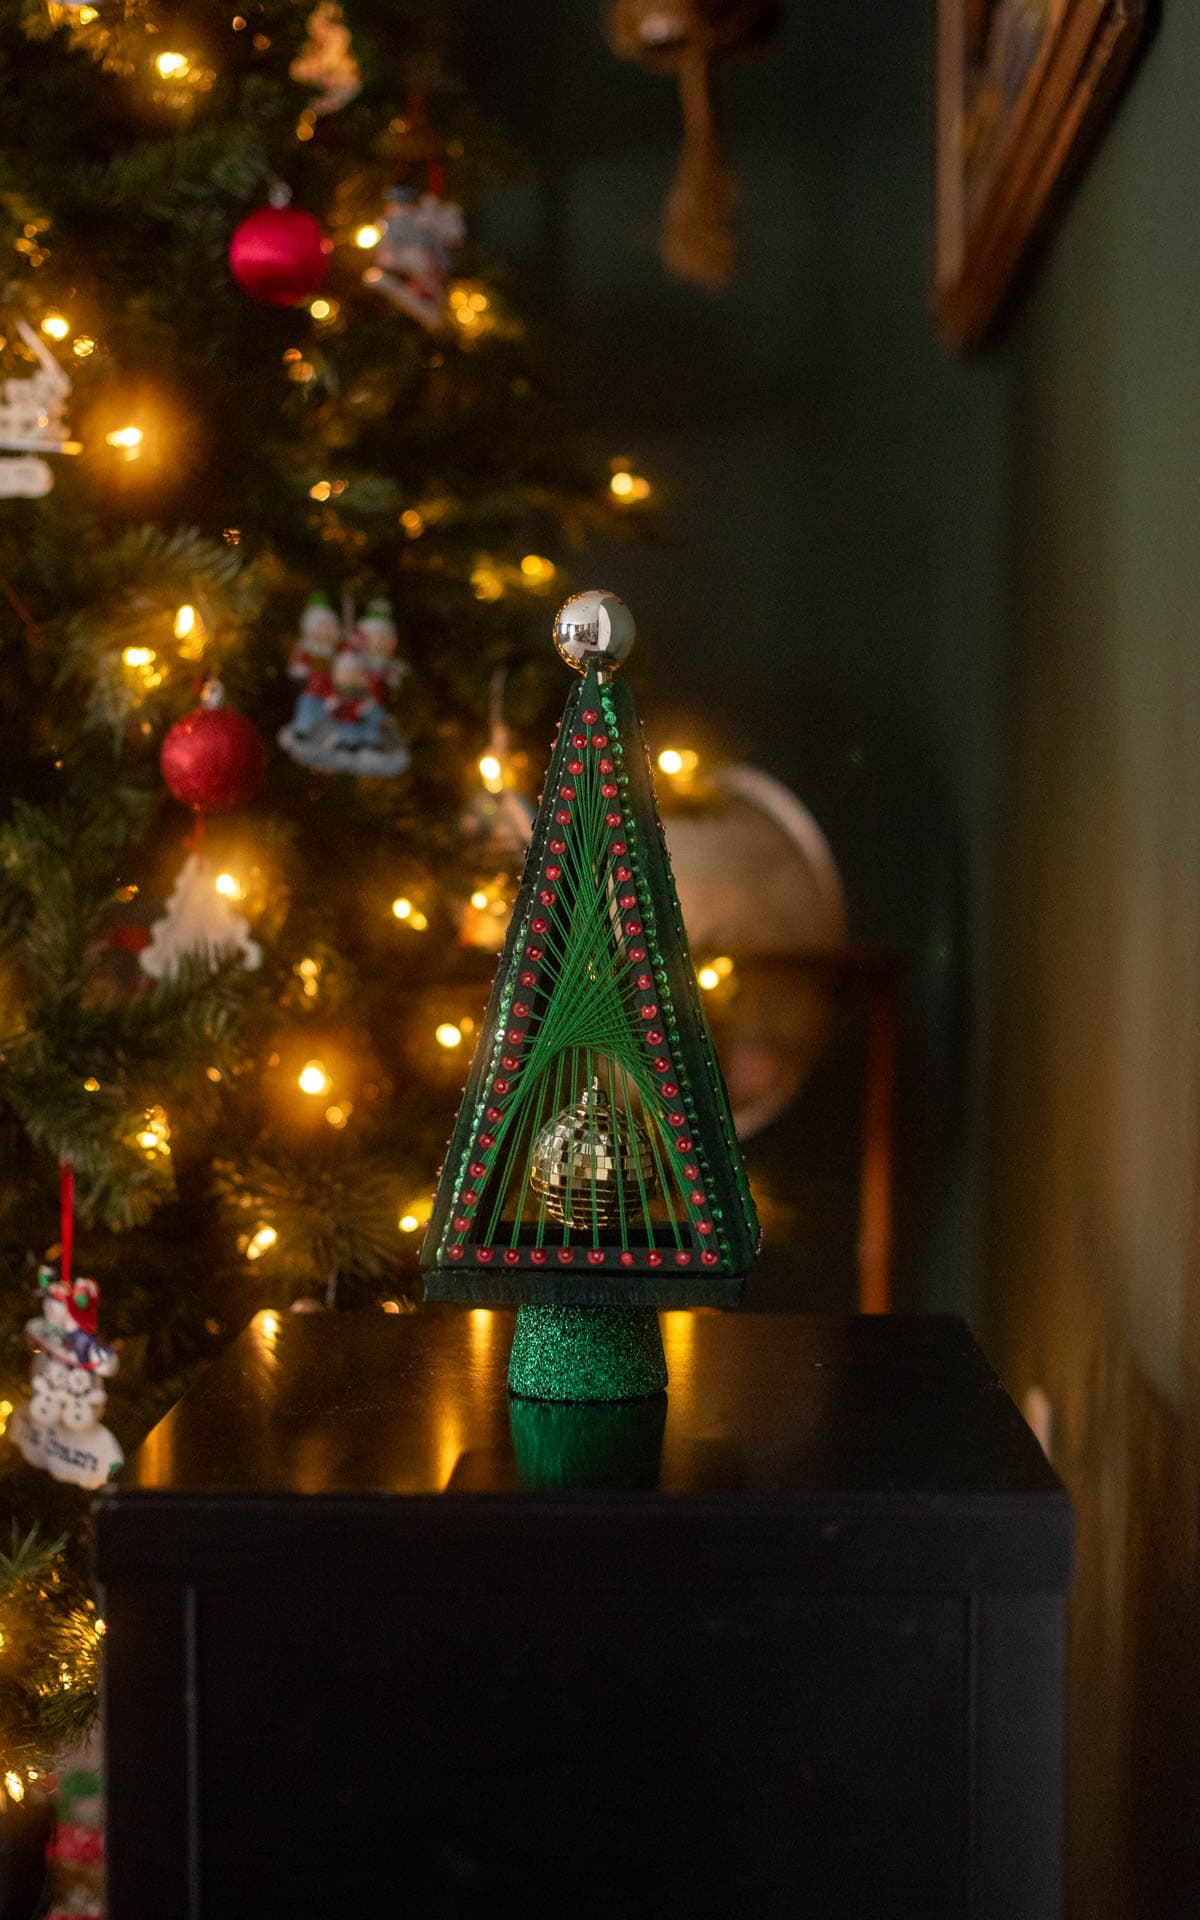
And just like that, you’ve created a vintage string art Christmas tree with serious 1970s charm. This is the kind of vintage Christmas craft that’s special enough to display year after year (and maybe even pass down someday).
If you make your own version of this string art Christmas tree, I’d love to see it! Leave a comment below, tag me on Instagram or Tik Tok, or save this project to Pinterest so you can come back to it later.
And if you’re loving this retro-inspired project, be sure to browse the rest of my Christmas crafts here on the blog.
Don’t forget to pin this for later!