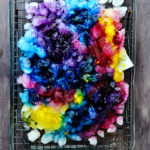
Tie dyeing with ice (or even snow) creates some of the most beautiful and unique tie dye patterns. The melting ice slowly pulls the dye through the fabric, which creates dramatic color separation and almost watercolor-like effects.
And the best part?
Ice tie dyeing is surprisingly easy. The active time is only about 10-15 minutes, and the rest of the magic happens while the ice melts.
You’re going to love this technique because it’s literally one of the easiest tie dye techniques ever. It’s also perfect if you’re tie dyeing with kids.
Since the dye powder sits on top of the ice, you don’t have squeeze bottles of liquid dye in the hands of children just waiting to stain everything. 😉
In this tutorial I’ll show you exactly how to use the ice tie dye technique to create bold color patterns on a simple white cotton t-shirt.
Along the way I’ll also answer a few of the most common questions people have about this method, like:
• How to avoid muddy tie dye colors
• Whether the back of the shirt gets as bright as the front
• Why ice dye creates more dramatic patterns than regular tie dye
If you love vintage-inspired DIY projects and creative fabric experiments, this is one technique that’s always fun to try.
UPDATE: I also tried this technique using bleach crystals and it turned out just as cool!
Why Do Ice Tie Dye Colors Sometimes Get Muddy?
One of the biggest frustrations with tie dye is when bright colors blend together and turn brown or dull.
This usually happens when:
• Complementary colors are placed too close together (like blue and orange or purple and yellow)
• Too much dye is applied in one area
• The fabric is folded tightly and forces colors to mix together
The nice thing about the ice tie dye technique is that the melting ice slowly pulls the dye through the fabric, which often creates more natural color separation.
Instead of muddy blending, you get bold areas of color that almost look like a galaxy or watercolor effect.

Want the instructions in an easy-to-read PDF?
Download them in the Creative Library!
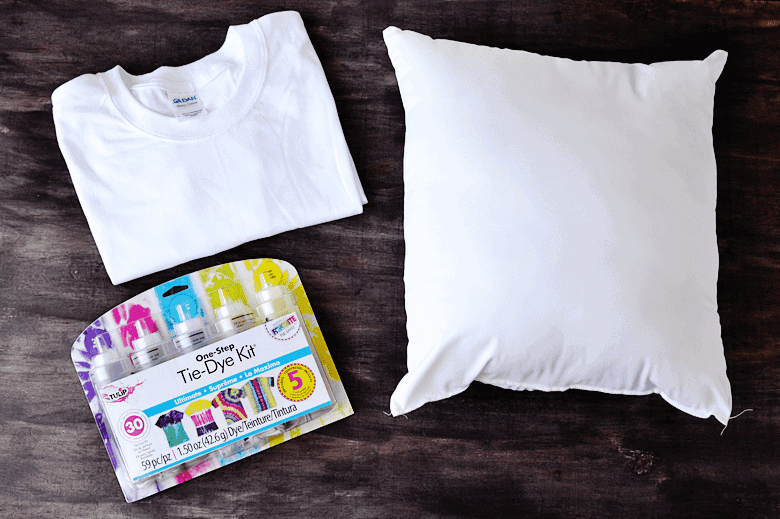
Ice Tie Dye Supplies
You only need a few simple supplies to try this technique!
Shop Ice Tie Dye Supplies
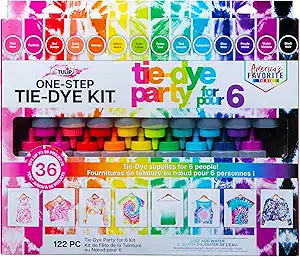
Tie-Dye Kit

White Cotton T-Shirt
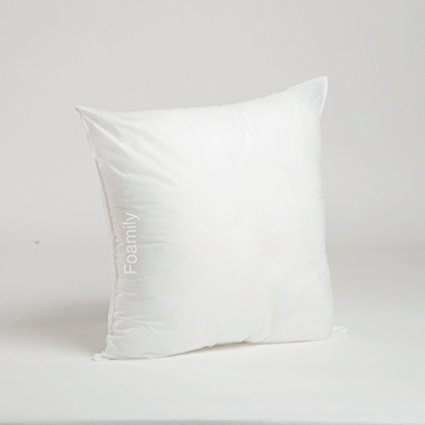
Pillow Insert
Other Supplies
- elevated rack (this prevents dye from pooling underneath)
- large container to collect ice drippings
- plastic wrap
- ice
- pillow insert (optional for the pillow project)
- scissors (optional for the pillow project)
- sewing pins (optional for the pillow project)
- sewing machine or simple needle and thread (optional for the pillow project)
How Long Does Ice Tie Dye Take?
Active time: 10-15 minutes
Soaking time: 6-8 hours (or overnight)
Most of the color magic happens while the ice slowly melts and pulls the dye through the fabric.
The longer it sits, the deeper the colors tend to become.
Ice Tie Dye Technique Tutorial
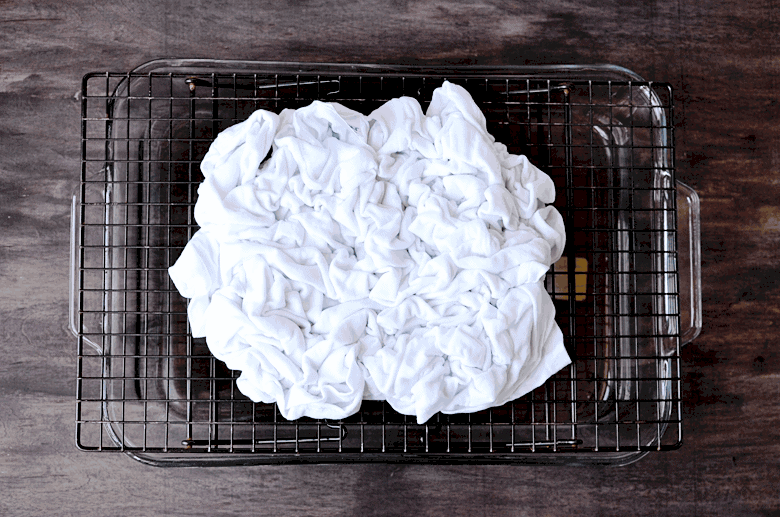
Step 1: Prepare Your Shirt
Get your t-shirt completely wet and then wring most of the moisture out.
Now comes the “tie” part of tie dye.
Scrunch up the shirt and place it on a rack positioned over a container or dish.
The amount of scrunching will affect the pattern.
More scrunching = more white space
Gentler scrunching = more color coverage
I wanted a lot of color in my design, so I scrunched mine fairly gently.
I used a glass Pyrex dish as my container because it fit nicely with the rack. Just make sure your container is large enough to catch the dye runoff.
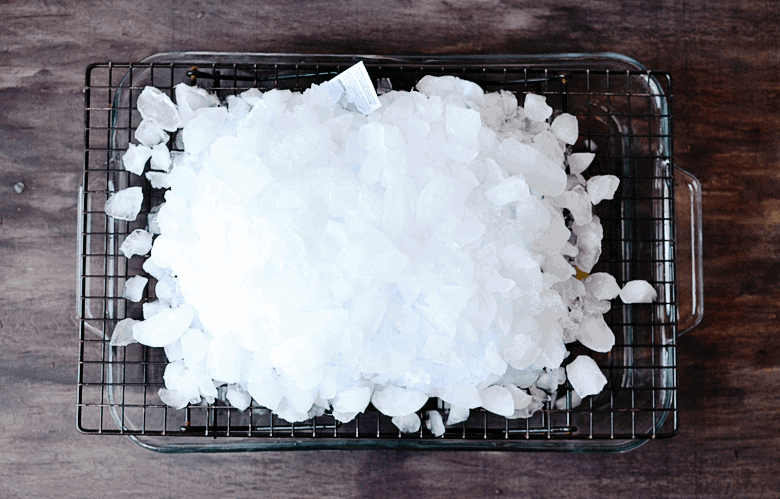
Step 2: Cover the Shirt with Ice
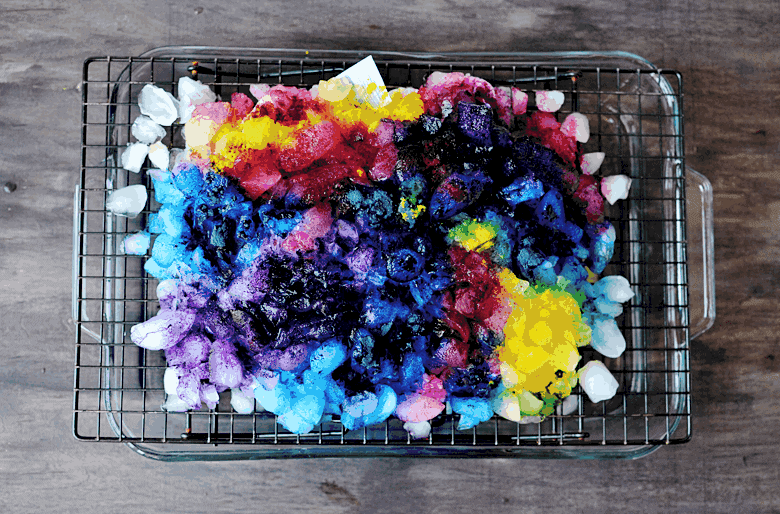
Generously cover the scrunched shirt with ice.
I used crushed ice so that I could cover the entire shirt evenly without large cubes sliding off the sides.
If you live somewhere with snow, you can absolutely try this technique using snow instead of ice. I haven’t personally tried it yet, but I’d love to!
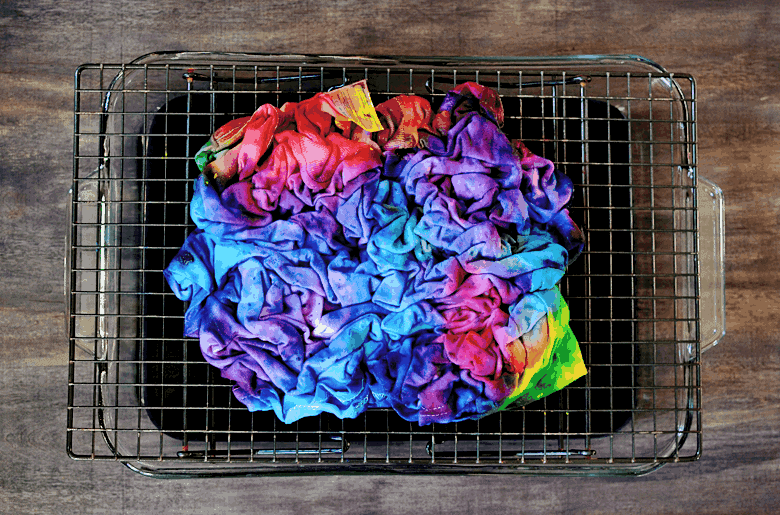
Step 3: Sprinkle the Dye Powder
Put on the gloves that come with your tie-dye kit.
Then sprinkle the dye powder pigments over the ice.
I didn’t follow any specific pattern here. I simply sprinkled the colors across the ice and let the melting process do its thing.
One helpful tip though:
Try to avoid placing complimentary colors next to each other that naturally mix into brown, such as blue with orange or purple with yellow.
Step 4: Let the Colors Soak
Cover everything loosely with plastic wrap so the fabric stays damp.
Let the shirt sit for 6-8 hours while the ice melts and the dye moves through the fabric.
Tip: The longer it sits, the more intense the colors will be!
Since I knew I planned to paint a design over the finished fabric, I let mine sit for about 6 hours so the colors wouldn’t be too intense.
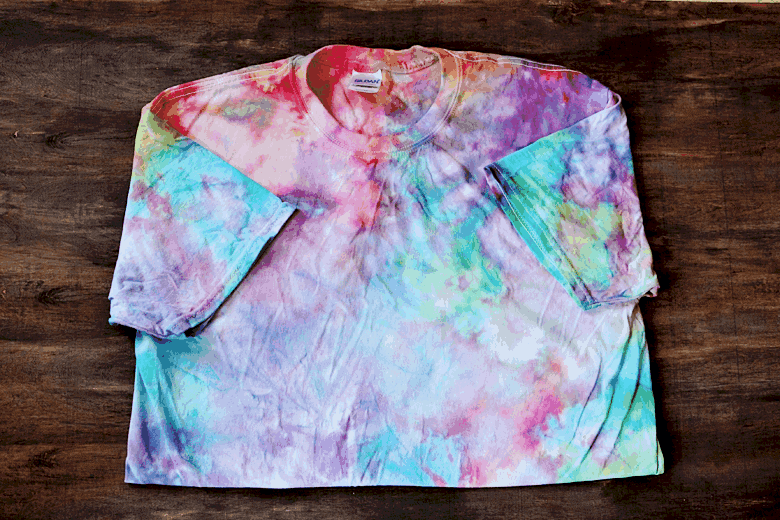
Step 5: Rinse and Dry
Rinse the shirt until the water runs clear. Then wash and dry it in the washing machine by itself.
At this point you’ll see the final tie dye pattern!
Does Ice Tie Dye Color the Back of the Shirt Too?
This is one of the most common questions about this technique.
Because the dye travels through the fabric as the ice melts, both sides of the shirt usually pick up color.
However, the side closest to the dye powder will typically have the strongest patterns.
If you want stronger color on both sides, you can:
- flip the shirt halfway through the melting process
- add dye to both sides
- make sure the rack allows dye to move freely through the fabric
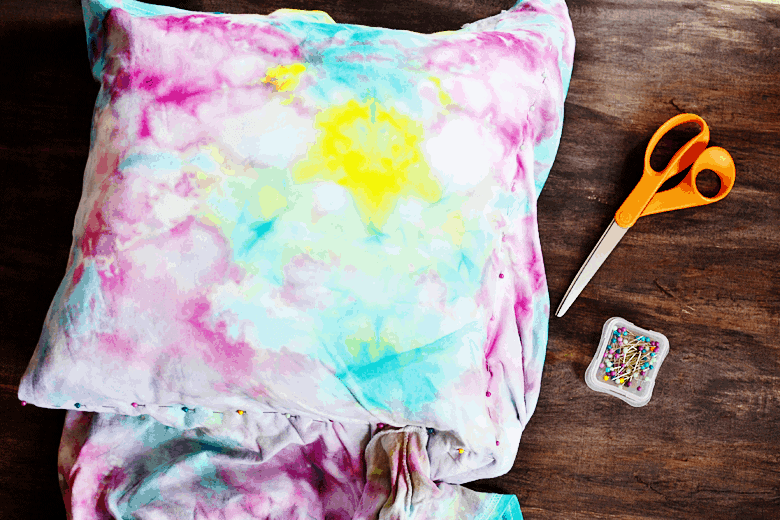
Turning Your Tie Dye Shirt Into a Throw Pillow (Optional)
The next few steps are optional if you’d like to turn your finished tie dye shirt into a throw pillow.
Step 6: Insert the Pillow Form
The following steps are optional if you wanted to turn your tshirt into a throw pillow.
Turn your t-shirt inside out and then slide the pillow insert into the t-shirt and up against one of the sides. That way, you will only have to sew up 3 sides instead of 4. Then, using your sewing pins, pull the t-shirt together along 2 of the sides.
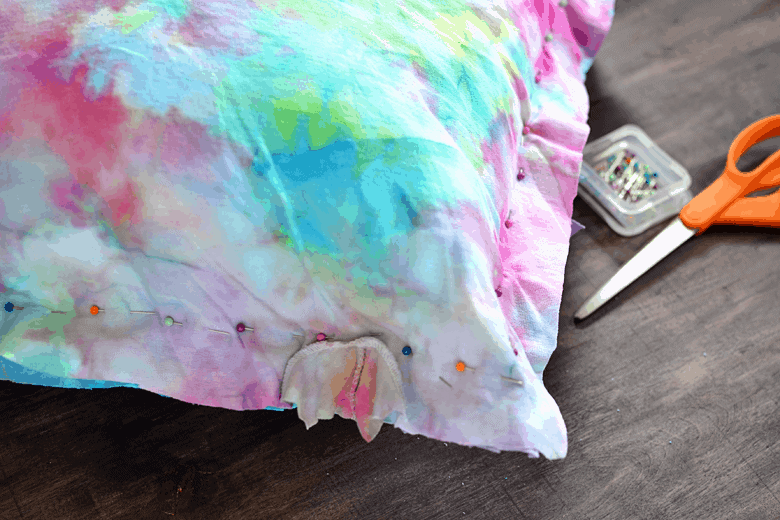
Step 7: Hand Sew Along the Edges
Grab your needle and thread by hand, sew up along the 2 pinned sides. Then, remove the pins, turn right-side out, insert the pillow, and repeat for the last open side. This side will have a slightly raw edge, but it will blend with the other sides once trimmed.
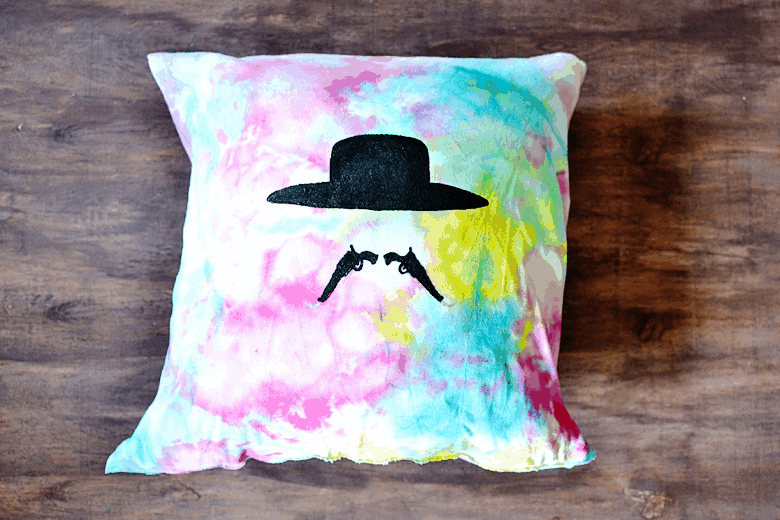
Step 8: Add a Design (Optional)
You can leave your pillow as-is, or embellish it with acrylic fabric paint.
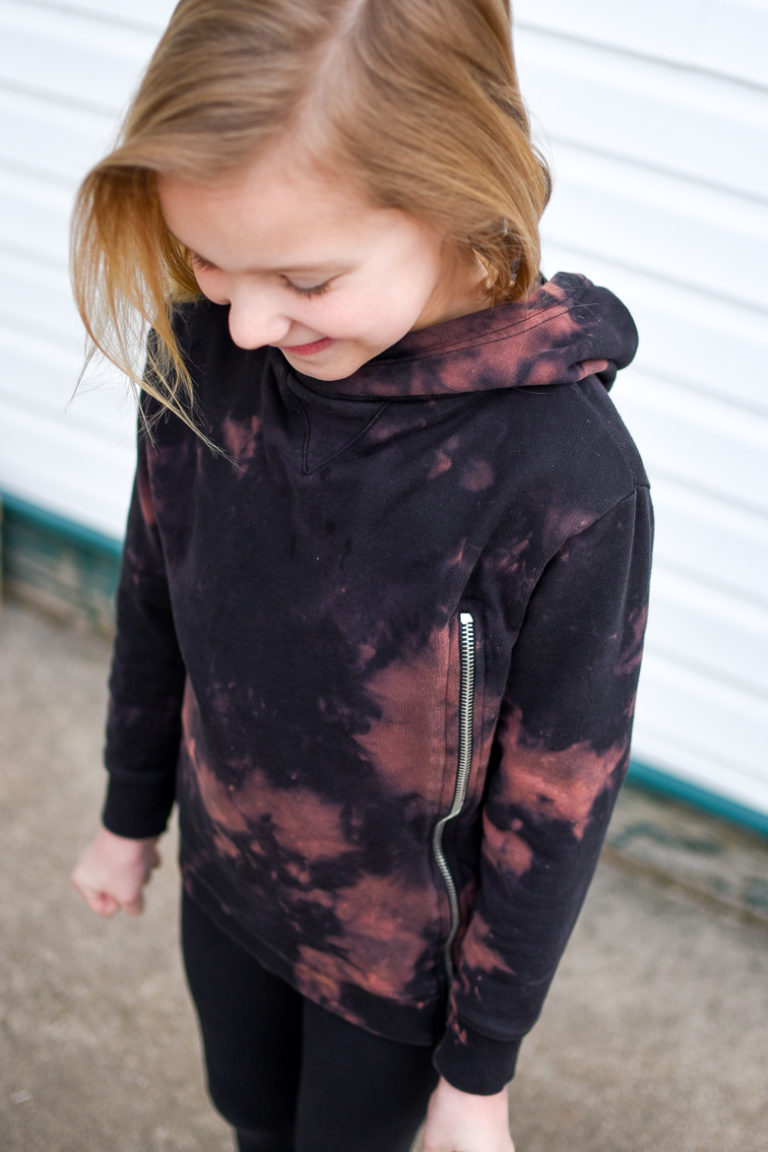
My husband is a huge Tombstone fan, so I used a minimalist Tombstone poster as inspiration for the design. I think it fits perfectly with our eclectic movie vibe. My next project might be a Breakfast Club themed throw pillow.
Luckily I still have plenty of dye left from my Tulip Tie-Dye Kit!
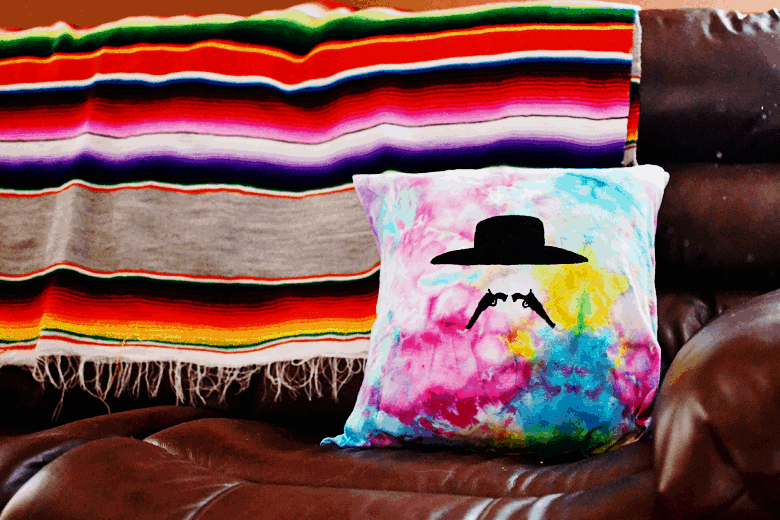
Why I Love This Ice Tie Dye Technique
What makes ice dye so fun is that no two shirts ever turn out exactly the same.
The melting ice slowly pulls dye through the fabric and creates unexpected patterns and color shifts.
The finished look reminds me a little of those bold retro camp shirts from the 70s but with even more dramatic color movement.
It’s one of those DIY experiments that always turns out interesting!

Ice Tie Dye Technique: How to Tie Dye with Ice
Materials
- Cotton T-Shirt or Other 100% Cotton Material
- Tie Dye Kit
- Ice or Snow
- Saran Wrap
Tools
- Glass Dish
- Cooling Rack
Instructions
Step 1: Prepare your t-shirt or other cotton material for tie dying
- Completely soak your t-shirt in cold water, wring the excess water out
- Place the rack inside of your dish
- Crumple your shirt up on top of the rack. The more wrinkles, the more detail your shirt will have.
- Place crushed ice on top of the crumpled up shirt. Make sure you cover as much as possible without it falling off.
Step 2: Apply the tie dye pigments
- Sprinkle the tie dye powders on your shirt generously. Keep in mind which colors you are placing next to each other so they don't turn brown.
Step 3: Let the dye soak in
- Cover the glass dish with saran wrap to keep the shirt moist as it sits.
- Allow the ice to melt and for the dye to penetrate the material for 6 to 8 hours.
Step 4: Rinse your shirt or material
- Rinse your shirt under cold water until the water runs clear.
- Wash and dry alone.
Notes
Remember, the longer the tie dye powder sits, the more vibrant and intense the colors will get.
This Ice Tie Dye Technique post was brought to you by Tulip and Blueprint Social. As always, all opinions are strictly my own. This post may contain affiliate links.

does the back of the shirt get dyed too? as bright, or lighter?
Mine turned out the same intensity front and back! I just made sure that I used plenty of tie dye powder and plenty of ice so that it would soak through.
I tie dye everyday, by far ice is the best while a color spilts, that means you can get away with using one color. for this your grays and browns are no longer the “ugly colors” I noticed the splits when I started using Dharma Trading Company dyes called “Fiber reactive procion dyes. I was always run out of tulip dyes. I was surprised at the dharma was cheaper and the colors were more intense. NO was dye you choose they all have value.
Happy tie dying
I’ll definitely check out the dharma trading company dyes, those sound awesome! I’ve only ever used tulip dyes before. Thanks for the recommendation!
Hello, I just tried ice dyeing and the results were great except for one thing. In places I could see some lines from the rack. They were quite faint but could still see them? How do you avoid this?
Interesting! That has never happened to me. I’m wondering if you maybe didn’t wet the shirt enough before hand or maybe didn’t use enough dye powder? Another option might be to place a thin layer of ice on top of the rack, then lay the item you’re tie dying on top of that, and then proceed with the technique. Hope this helps!
Thanks for this tutorial! It’s super helpful with the pictures.
Happy to help 🙂 I love this tie dye technique so much!
you don’t mention soaking in soda ash. if one doesn’t use soda ash, how does color stay in garment?
I have a down comforter I want to tie dye- any suggestions?!
Do we place the ice on the shirt before the dye? I didn’t see a step explaining when to use the ice and I don’t want to assume and do it wrong. I am really excited to try this. 🙂
Good question! Yes, place the ice on the shirt first, then you can sprinkle the dye on top. The ice melting will activate the dye. Let me know if you have any other questions!
I put the dye in plastic bottles like you use with hair dye. Kids could then easily sprinkle dye where they wanted. Very fun!
What a great idea, Dawn!
This was so much fun! Easy to do and turned out so cute! I used Rit brand dye in purple, green, and blue. I used a hair dryer to melt the ice to speed up the process. I want to tie dye everything using this method!
I started out with turquoise at the top and them I did another solid in the middle and them another solid color at the bottom, but had shot of dye left so I just randomly sprinkled all over , the blue and the green, It was called moody blue!! But it turned out pretty cool.. I like the ice effect. Thank you.
That sounds gorgeous! I would love to see a photo!
Thanks Kerri! I'm really loving the unique look it gives 🙂
If you try it you'll have to let me know what you think, I loved it!
So creative!! Love the result!
So creative!! Love the result!
Thanks Kerri! I’m really loving the unique look it gives 🙂
I love how the ice tie dye looks, definitely going to have to try this!
I love how the ice tie dye looks, definitely going to have to try this!
If you try it you’ll have to let me know what you think, I loved it!
haha nice. It was really so easy and I think it gave such a unique effect. Definitely going to do more this summer!
um…this is really cool!! (no pun intended LOL)
um…this is really cool!! (no pun intended LOL)
haha nice. It was really so easy and I think it gave such a unique effect. Definitely going to do more this summer!